DIY pond in the country: 9 tips for organizing
The decorative pond in the country has long ceased to be something special and rare. But this does not mean at all that this element of the landscape has become obsolete and has become unpopular. The artificial ones are in great demand. ponds in summer cottageslocated at a considerable distance from the natural reservoir. But when going on vacation to nature, I really want to contemplate the calm water surface. As the saying goes - "you look, and the eye rejoices." Therefore, many summer residents who want to turn their land into a real place for recreation, and not for hard physical labor, often ask themselves “how can you make a pond in the country with your own hands”. We will be happy to answer this question and give 9 tips for self-organizing artificial pond. We will show you how to choose the right place for the pond, which plants are suitable for decorating it and how to make the coastal zone as natural and suitable as possible. in style to the overall design of the site. 
How to choose a place for the pond?
Choosing the right place for the location of the future pond is the guarantee that in the future the process of maintaining and caring for the reservoir will be as simple and not laborious as possible. Also, the chosen place will contribute to the formation of a particular microclimate and it is necessary that the ecological system is as close to natural as possible. Then your pond does not turn into a green swamp overgrown with mud and other algae.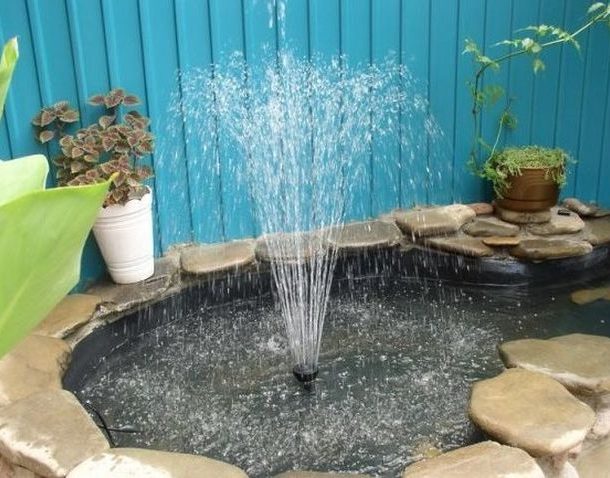
- Given that the pond will be used for decorative purposes, and not for swimming, it does not need a large amount of light, which would contribute to the heating of water. On the contrary, you should try to choose a place so that the sun illuminates the water surface either only in the morning or after lunch. With constant lighting, the water temperature will reach very high levels and all life in it will simply perish;
- A place completely shaded will not work either. Since the plants that will inhabit the pond and will be planted on the coastal zone, light is required for their proper development;

- If there is no possibility and desire to dig a pit near one of the walls of the house in order to provide shade, you can shade it with the help of a large shrub, or place it at the foot of a tree already on the site. If there is no tree in the desired place, you will have to plant it. Many prefer trees with a weeping crown, for example, decorative willows. They really look good near water bodies and allow you to fit the pond into the landscape as naturally as possible. But be prepared for the fact that the overhanging crown will oblige to constantly clean the fallen leaves. And you need to do this regularly, otherwise the water will become contaminated;
- If the terrain is bumpy, it is reasonable to choose the lowest possible current, into which rain and melt water flows. In the future, this may become a good alternative source of replenishment of water reserves, especially if there is no distribution of technical or irrigation water in the area;
- If the plot is flat, the pond may not look quite natural. In this case, try to place it between large plantations, and not in the middle lawnto give the impression that the pond has always been there and over time it was surrounded by vegetation.


To understand where on your site is that cherished, not sunny, but not too shady place, you just need to observe the movement of the sun. Using sand or any other substance found on the site, draw the contour of the future pond at the intended location. After that, just detect how many hours and in what half of the day this place is in the sun. If necessary, shift the marking until you get only morning or afternoon safe lighting.
The shape and dimensions of the pit
There is no unanimous answer to this question, because someone prefers strict straightforward forms, and someone dreams of a pond with an intricate coastline. Therefore, the main rule that should be followed when choosing a form is maximum compliance with the surrounding landscape. That is, the contours of the pond should "fit" into the overall design of the entire site and not contradict it.
- Rectangular or square ponds are more suitable for a strict and regular landscape, in which there are green rectangular borders along paths from undersized shrubs, where there are already flower beds or front gardens of a similar shape. Where all plants are strictly ordered and cut to a geometric shape;
- Round ponds are most often found in gardens decorated in the English style;
- Irregular, winding, ornate contours resembling the outlines of a small lake are the most natural and fit almost any landscape.
Concerning size everything is also purely individual here. The pond can take up almost all the free space, and have dimensions meter to meter. One thing is certain - the larger the area of the reservoir, the easier it is to take care of it. This is due to the fact that in large water volumes a healthy and regular ecosystem is established much faster, which means that water will not bloom, stagnate and cloud.
But as for depths, it is not recommended that it be less than 50 cm. For decorative ponds and less than 1.5 meters for fish ponds.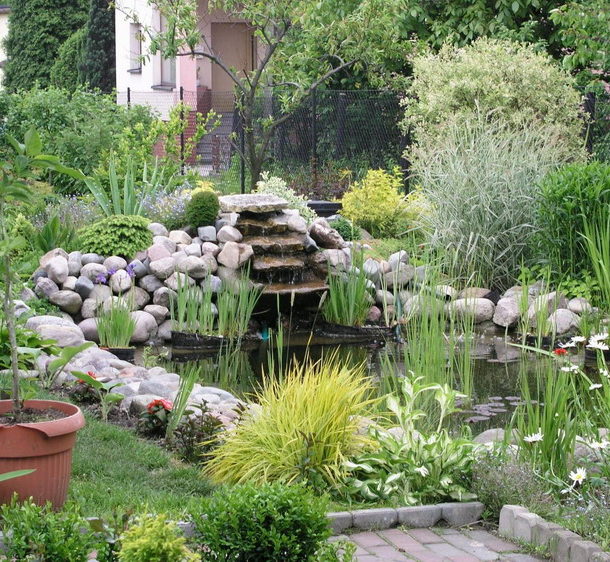
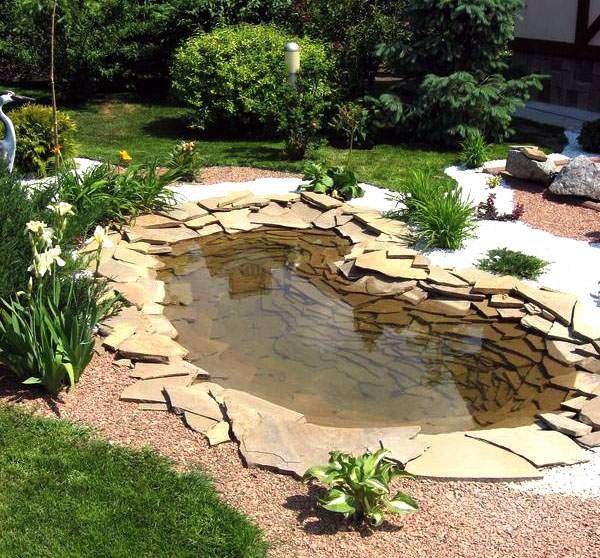
Also not recommended to do pit bottom perfectly flat. Better let it be a terrace, as is usually found in natural rivers and lakes. On them in the future it will be convenient to arrange aquatic plants. After all, there will be no soil at the bottom, so you will have to use containers with soil. Yes, and facing stepped slopes with decorative stone will be much easier.
Which waterproofing method is more convenient?
To date, there are three main ways to equip a waterproofing bowl for a future pond. It is impossible to say unequivocally which one is better, because everyone has their own advantages and disadvantages, they all have different costs, and the performer himself may have preferences for working with one or another material. 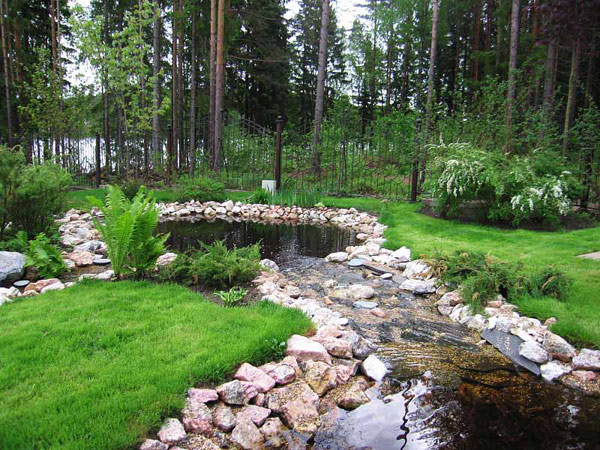 Let's start with the most time-consuming method:
- Concrete bowl. Concrete used to be ubiquitous since there simply were no alternatives. For arrangement concrete bowl you must have the skills to work with the installation of formwork, fittingspouring the finished composition and be able to knead it in the correct proportions. It is especially difficult to fill curved and beveled surfaces. Therefore, concrete is more suitable for creating straight reservoirs. In addition, concrete still requires additional insulation, so regular exposure to water has a destructive effect on it. That is why the bottom of concrete pools is still covered PVC film. In addition, if in the process you suddenly want to change the contours or even the location of the pond, it will be impossible to do this. And the dismantling of such a structure in the future may entail significant costs. The advantage of this material is its ability to withstand the tremendous pressure of large volumes of water;
- Film. For waterproofing pits of small depth and area, a special PVC black film. It comes in different thicknesses. For ponds whose depth does not exceed 80 cm, a 0.8 mm thick film is sufficient. If the depth of the reservoir will be more than 1 meter, you should choose a canvas with a thickness of 1.2-1.5 mm. Such a substrate perfectly copes with its task and has a service life of about 10 years, but has a tendency to crack under the influence of subzero temperatures. In the event of damage to the integrity of the coating, it can be easily repaired using ordinary adhesive tape. Longer life has butyl rubber film - from 30 to 50 years. Its cost is much higher, but is fully justified. The material is resistant to low temperatures, more elastic, resistant to long-term exposure to sunlight and is suitable for fish ponds. For very tiny ponds sometimes use the usual polyethylene a film with a thickness of more than 500 microns. It is affordable, but wears out within 2-3 years. Therefore, such material should be chosen only for “trial” ponds, which are sometimes equipped in order to understand whether there is enough strength and patience to look after a larger element;
- Finished form. Such a bowl may be made of plastic or composite materials, such as fiberglass. The latter option is more expensive and is often used to create pools. The walls can have a very different shade, both blue and dark. Plastic molds are most commonly used. They can have a rather unusual shape, but are limited in volume. But the process of creating a pond using such an element is simpler and faster. Difficulties can arise with the self-transportation of the form, because there is a possibility of damage to it. Also, thin plastic can crack in the cold.


Further, we will not consider a method of creating a pond with a reinforced concrete bowl, since almost no one uses this method, but we will focus on options that can be completed independently in a few days.
Film pond - work stages
Ponds with a soft backing are good because you are not limited in the choice of its shape and size. But if this is your first pond, it is not recommended that its area exceed 10 square meters. The stages of work will be as follows:
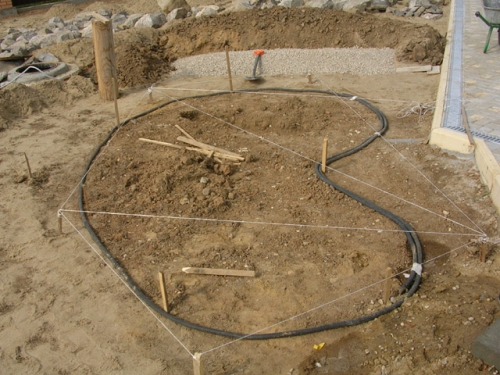
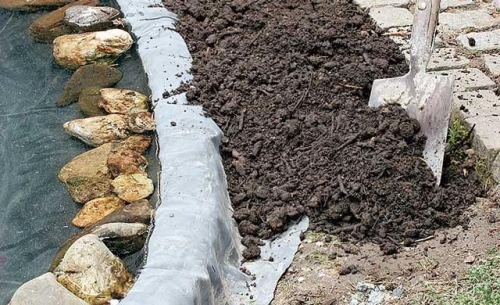
- We assume that the place for the pond has already been determined. Then you need to clearly transfer its contours to the ground. This can be done with the help of sand, or simply laying a rubber hose, cord and any other item on the ground. Keep in mind that at least 1 meter wide should remain free along the perimeter of the reservoir. And the larger the pond itself, the wider this gap should be. In the future, this section will occupy the drainage circuit, the scenery of the coastal zone and plants;
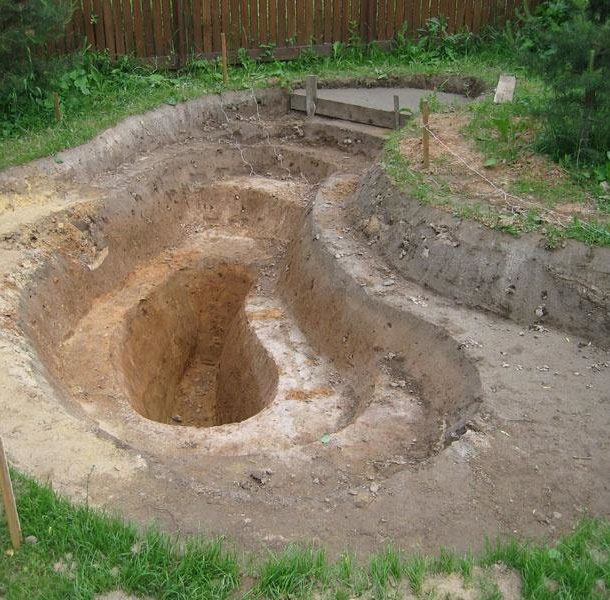
- Getting to the excavation of the pit. You need to start from the edges, gradually deepening. Thus, the maximum depth should be in the center of the pit. Remember that the bottom must have trails. Their height may be different, but the minimum value should be in the range of 30-40 cm. Their width should not be less than 25 cm, otherwise after finishing you will not have space for plants. First remove the soil layer with a depth of 30 (or more) cm. After that, level the soil and tamp it a little. Step away from the edges 25-30 cm and re-mark at a selected distance along the entire perimeter. You will get a small copy of the outline. Inside the marking, remove another layer of soil with a depth of 30 cm. Level the bottom and slightly compact. You should get two flat terraces. In this way, you need to remove the soil until you reach the desired depth. If you plan to keep fish and plants year-round, the depth should be at least 2.5 meters. We recommend immediately putting the soil in a separate place, we then use it to strengthen the coastal zone;
- We proceed to ramming the pit. At this stage, it is important to break all the large clods of soil and, if the bottom is rocky, ram the stones into the ground;
- If you see that there is no way to avoid the presence of sharp stones at the bottom, you need to provide additional protection to the insulating material. For this, the bottom is covered with shallow river sand. It is necessary to use only sifted material so that it does not have broken shells. On top of the sand embankment is laid geotextile backing;
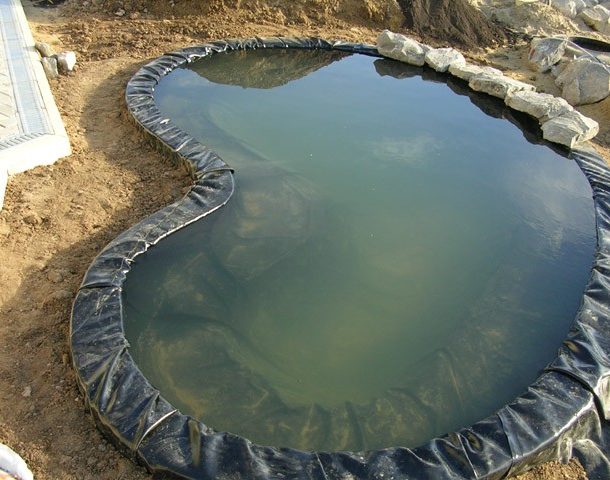
- Now you need to create a drainage circuit. To do this, we retreat 15–20 cm from the edge of the pit and drive the pegs to a sufficient depth (about 30 cm). The distance between the pegs should be such that they repeat the outline of the pit as much as possible. It is necessary to ensure that the pegs have the same height on all sides and are located opposite each other. After that, with a piece of film, you need to wrap the pegs on the outside and dig a ditch about 20 cm wide and deep. The film is needed so that the soil does not crumble into the pit;
- When the groove is ready, you need to remove all stones and roots from it, tamp the soil a little and proceed to covering the pit with a film. But first you need to remove the pegs;
- The film must be bought with a margin of at least 50 cm along the contour, and in the case of a drainage groove, about 1 meter. The necessary film width can be calculated by the formula WPL = WPR + (HL pr × 2) + 3, where WPR. - this is the width of the pond, Ch. Pr. - its depth, З - reserve, in meters. Polka length is calculated in a similar way. Dpl = D pr + (GL pr × 2) + 3;
- When spreading the film, be sure to lay it in a free state and, using medium-sized stones, fix it on the terraces so that the film follows the contours of the bottom well;
- When you reach the coastline, begin to lay the film in the drainage groove also crushing it with stones, make sure that there is no interference;
- The edge of the film should protrude beyond the grooves by 20-25 cm, so that it is possible to fill it under the drainage embankment;
- Now we need to check how we laid the film. To do this, fill the pond with water. This should be done slowly, carefully watching the film. It should not be pulled, if in some place it has moved, it must be corrected, since then it will be impossible to do it. It is necessary to fill the pond almost completely;
- Today your work is over, since the pond needs to be left full for the night, so that before proceeding with fixing the edges of the film, it could stretch out and repeat the shape of the pit as much as possible. Put a mark on the film that will correspond to the water level;
- The next day, first see if the water is gone. If less than 1 cm is not enough, and the pond is created in the summer, these are the effects of evaporation. If there are not enough good tens of cm, then the integrity of the film during installation is damaged and the water goes into the ground through a hole. We'll have to find the defect and fix it, and then do it all over again;
- If everything is in order, proceed to falling asleep the drainage groove. On its contour, you have already laid larger stones. They can be left if their edges are not sharp. The free depth of the groove must be covered with medium-sized gravel;
- The remnants of the film along the drainage circuit should not be cut to zero, it will be more reliable to hide them under the stones, just tucking them.


Well, that’s all, the most difficult part of the work is behind, now you can start the more creative process - the design of the pond, but more on that later.
Ready-made pond - quick and easy
If it is more convenient for you to work with the finished form, then the most difficult will be to dig a pit under it. After all, he clearly must repeat all its bends and drops of depth, but at the same time be 10-15 cm larger along the contour. 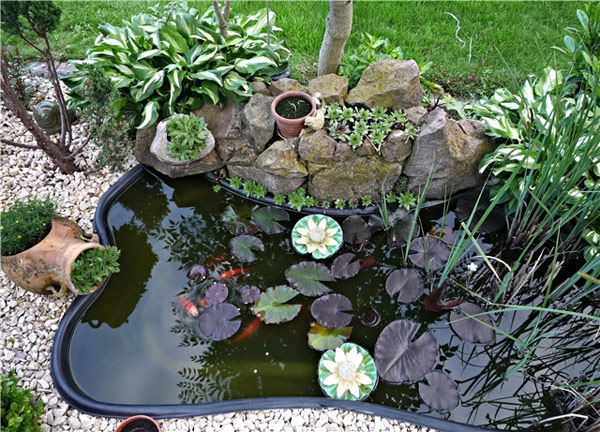 This is done as follows:
- The bowl should be placed in the desired place and with the help of sand to transfer its contour to the ground;
- Now it is necessary to measure all depths using a tape measure to understand how asymmetric the shape is;
- After that, you can start digging the pit, having previously stepped back from the contour 10 -15 cm more to get a gap. You need to act as in the previous example - remove the soil in layers. For example, you determined by measuring that the first tier of the form is the same in depth and the distance from the edge to the first terrace is 40 cm. We remove this thickness of soil over the entire surface. After that, we measure the width of the ledge on the form and the distance from it to the next terrace. Once again we draw a contour and remove according to it the desired layer of soil. So we continue to the very bottom of the form and make sure that the walls do not crumble;
- Carefully level the bottom of the pit, ram it and clean it from sharp stones;
- At the bottom of the mold, we form a sand cushion, set the mold in the pit, check the correspondence of the contour and depths. And we control with building level deviation of the position of the form from the horizon;
- If everything meets the requirements, fill out the form one-third with water and let it stand for a while, disperse under the weight of the water;
- After an hour, you can begin to backfill the gap along the contour. This must be done sequentially, periodically pouring sand with water, so that it is more carefully compacted, because it is the sand that will fix the shape.

That's all, as you can see, this process is somewhat faster than creating a pond with a substrate of film.
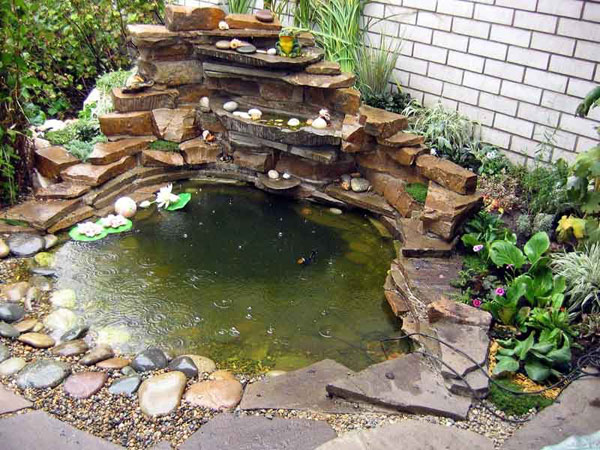
Raised ponds
This type of reservoirs is also very common in summer cottages. By the principle of creation and its final appearance, it resembles a flowerbed, whose sides are formed from bricks or natural stone.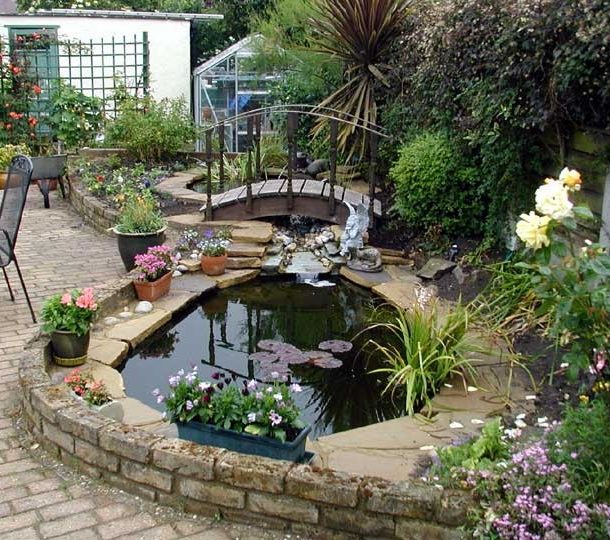
- Such a pond can be made both using a film and a plastic form;
- The only thing to add is the need to create elevations along the contour;
- In the case of the film, the foundation pit is also delved in the same way, sand is poured out if necessary and geotextiles are laid. The recess is covered with a film. In the same way, a groove is dug at a small distance from the edge to a depth of 30 cm, only in this case we will not use it for laying drainage, but to create a foundation for the outer frame;
- The film does not fit into the ditch, it so far lies only inside the pit. Sand is poured at the bottom of the groove, then fine gravel, then a layer of cement-sand mixture. If the border is low, literally two bricks, you can immediately lay out the first layer using cement as a retainer until it froze;
- If the edging will reach a height of 30-50 cm, you need to create a strip foundation along the contour. When it completely hardens, you can start laying stone or brick along the contour;
- When it remains to put only one layer around the perimeter, you need to lay the film along the seam. To do this, fill the pond with water before reaching the edge of the pit 20-30 cm, allow the film to stretch and straighten its edges. After this, half the thickness of the mortar is applied to the brick, a film is bent on it, the second half of the mortar is placed, and the last brick or stone is placed on top. At this stage, it is very important to ensure that the film does not have strong tension;
- After the solution has dried, the edges of the film will be firmly fixed inside the brickwork. Please note that you can refill the film at any desired height. Indeed, in our case, the water will reach right up to the penultimate brick. You can retreat more, depending on the height of the sides;
- The film protruding from the outside can be cut. But if you plan to make plantings around the sides, and the edges of the film do not rise much above the ground and allow you to just lower it down like a skirt and crush it with pebbles, and then hide under the soil, it’s better to do so.
Fish pond - prerequisites, the choice of fish
If the pond was originally formed with one single goal - to get decorative fish in it, then the depth of the reservoir will be one of the main conditions for their maintenance.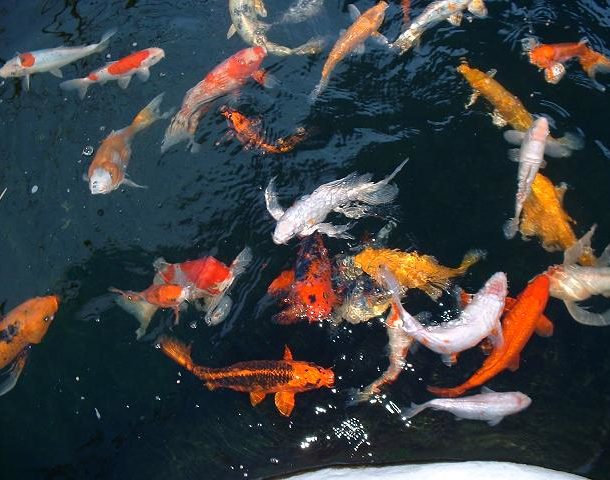
- If you plan to fish for the winter, the depth may be 1.2-1.5 meters;
- If you want to equip a year-round pond, its depth must exceed the depth of the level of freezing of the soil by at least 1 meter. In this case, some species of fish will be able to normally survive the wintering and not die;
- Water quality directly determines the possibility of living creatures in it. To maintain this indicator at a normal level, be sure to install filtering equipment;
- Enrich the pond with plants that can saturate the water with oxygen and serve as a source of nutrients or even fish food;
- The most difficult thing is to maintain the water temperature at a level suitable for fish living. In winter, the thermometer should not fall below + 4 ° C, in summer should not rise above 18-25 ° C;
- Will have to control the level of acidity of the water. Its optimal indicator is in the range of 7-8.5 pH. A change in acidity can cause stress among residents, and its differences are most often associated with poor aeration, oversaturation of water with elements of the vital functions of fish and plants, excessive lighting and heating;
- In winter, you need to create ice holes in frozen water so that the fish receive oxygen. To avoid repeated freezing, straw is laid at the edges;
- The volume of the reservoir should be calculated depending on the number of its inhabitants. So, for every fish whose body length will not exceed 15 cm, 50 liters of water is required.

If you have not changed your mind, check out the list of fish that are good for beginners because of their stamina and unpretentiousness:
- Carp Koi. This is a fish of Japanese selection. It has a very beautiful, bright color. Fishes even allow you to feed yourself;
- Pond carp will be more affordable;
- Silver carp;
- From predatory fish, you can try to get pikes or perches.
Do not place herbivorous and predatory fish in the same body of water.
Filter selection
In order to care for the pond and maintain its condition at the level, you can install filtering equipment. The filter is installed immediately after installing the waterproofing.  Moreover, the filtering process itself can be of two types:
- Biological - when special bacteria are launched into it to clean the reservoir, which contribute to the decomposition of organic pollutants into components such as oxygen, nitrogen and carbon;
- Chemical - when cleaning occurs by adding special chemicals to the water;
- Ultraviolet is a safe method for both fish and plants, but it has a detrimental effect on microorganisms. Also, UV radiation is unsafe for human skin and organs of vision;
- Mechanical - the most popular method, which is able to give a reservoir of crystal purity. At the same time, the entire volume of water is pumped through a special filter system, leaving the smallest particles in it.
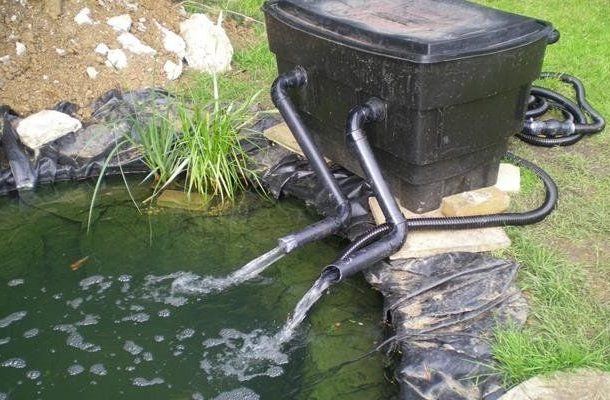
The filter is selected depending on the volume of the pond, its illumination, the presence of living organisms and the power of the pump, if used.
- Flow filters necessarily require the installation of a pump. It creates pressure in the system and helps pump water. Such a filter should be selected for small ponds, the volume of which does not exceed 300-350 cubic meters;
- The pressure filter is the least productive. He can handle a water volume of not more than 60 cubic meters. It also works in conjunction with a circulation pump. The principle of operation is similar to flow-through, only a pressure unit, which can supply a pressure of water up to 55 meters high, is also equipped with a pump and a deep filtration module;
- The simplest filter is sand. It is a container in which a collector for sand and algae is installed. But after accumulation inside the organics, the decomposition process begins, in which harmful methane, hydrogen sulfide and other gases are released;
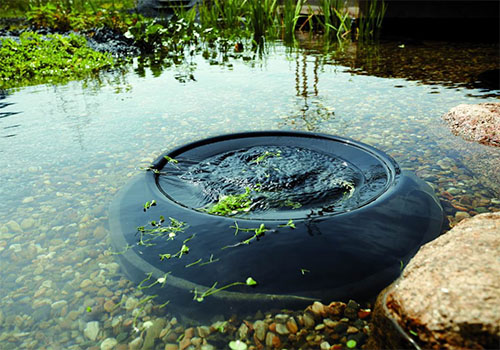
- A skimmer is a filter floating on the surface of the water that passes through the top layer of water and traps debris. As an independent full-fledged purification system, it is not suitable, but in combination with a flow or pressure cleaner, it greatly simplifies human labor.
In order for the filter to really do its job, it must pass through itself the entire volume of water in the pond in no more than 1.5 hours. This parameter is called instrument performance. Filter pressure means the speed at which water circulates inside the system. And capacity is the amount of circulating water.
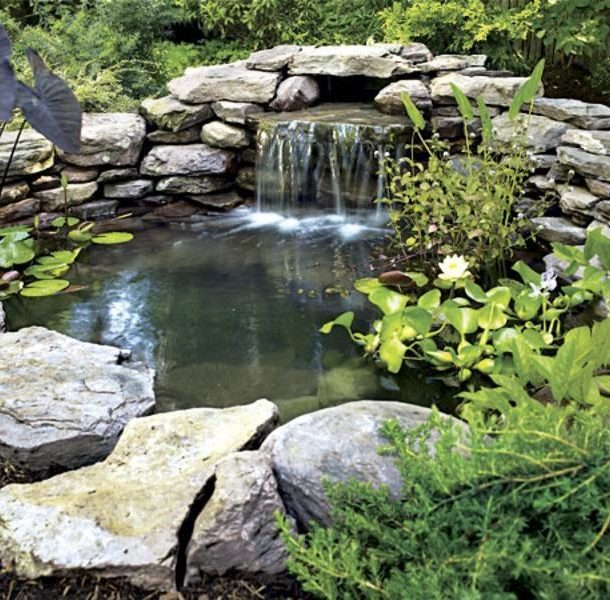
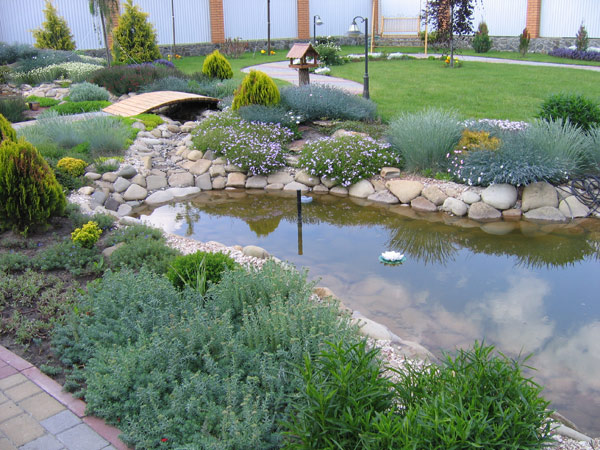
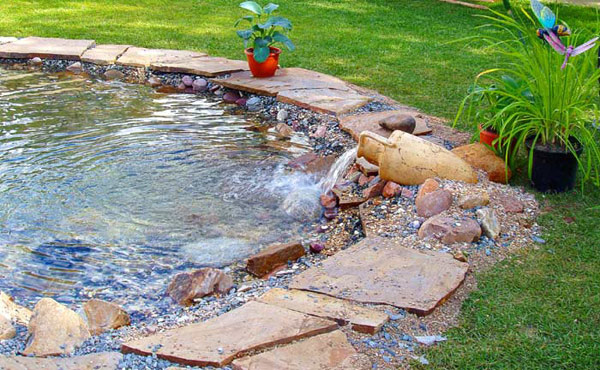
Decorating Tips
You can decorate and decorate the coastal zone in a variety of ways:
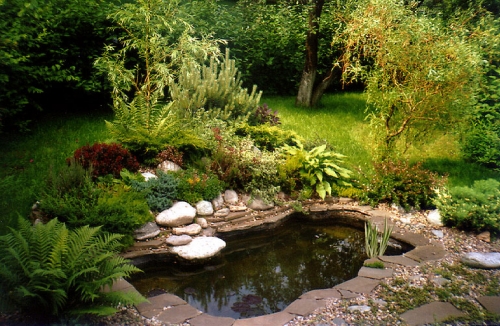
- You can arrange a real pond around rock garden or beautiful rockery;
- Lay old or specially aged amphoras in such a way that their neck is facing the water;
- Masking the edges of the film can be done using fine pebbles, wooden logs, sandstone or slate, planted with creeping plants on the ground;
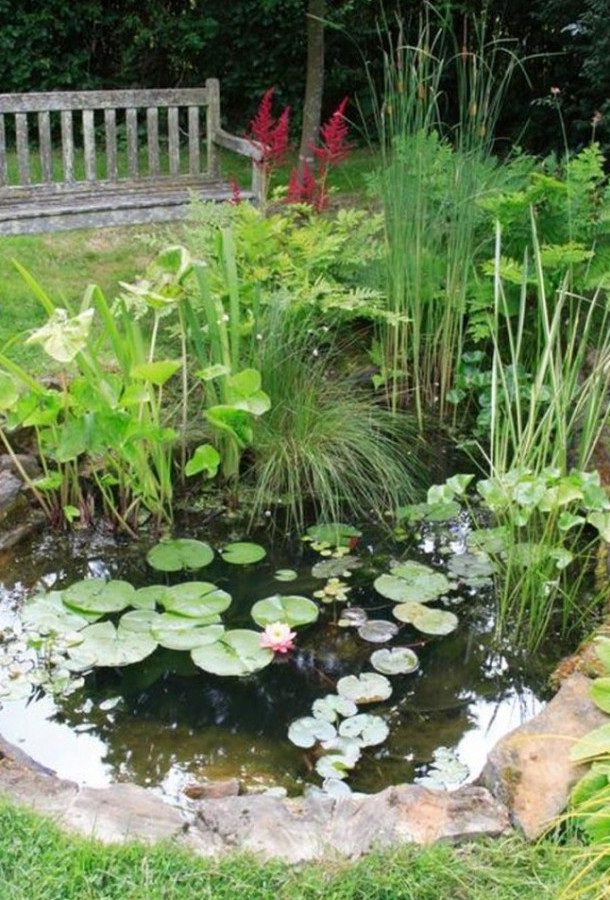
- Inside the reservoir to saturate the water with oxygen, plant an elodea. For water purification - nymphaeum and cattail. The soil in the pot should just fix the plant, it does not have to be nutritious;
- Water lilies and lotus leaves on the surface will create an additional shadow and prevent the flowering of the pond;
- If you want to plant a coastal line with perennials, do not plant them too often. In the second year, they will grow and may require thinning;
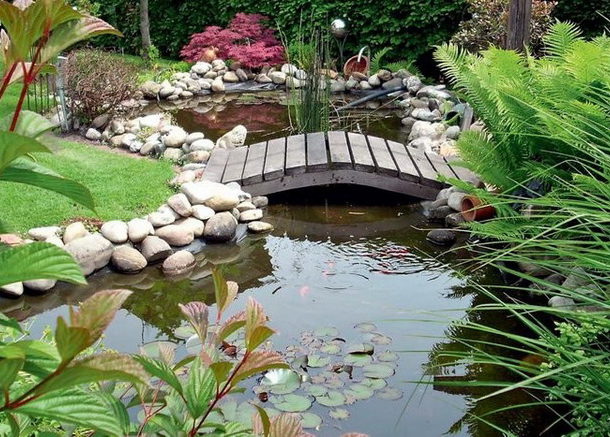
- Small decorative bridges look very beautiful, which are installed either at the head of the pond, or on both banks;
- And do not forget to put a small shop nearby to be able to admire your creation.

 How to make a dry stream with your own hands in the country: 4 ...
 11 tips for landscaping a small plot + photo
 How to hammer a nail?
 4 tips for installing a TV in the bedroom
 Well in the country: where to dig, how to strengthen, how to arrange
 Outdoor washbasin for summer house and garden: choose the finished one ...
 6 tips for the location of the septic tank on the site
 6 tips for watering the lawn: equipment, frequency, norms
 DIY rock garden: 9 tips for organizing + photos
 7 tips for decorating a barbecue area in the country + photo