How to make wiring in an apartment
Replacing wiring is one of the most difficult repair stageswhich is usually trusted by professionals. Their services are not the cheapest, so if you are very limited in funds, then you can try to cope with this task yourself.
What to look for?
As a rule, they resort to replacing wiring in those cases when the old one was laid back in Soviet times and completely outlived itself. Previously, completely different standards for carrying out such work were standard, so today you need to pay attention to such key points:
 Aluminum wires must be replaced with copper. The fact is that earlier aluminum production was cheap and environmentally friendly, unlike copper. Now everything has changed: it became safe to get copper, and over the years of operation it turned out that aluminum was completely unsuitable for organizing electrical wiring. Due to some chemical and physical features, after several decades of operation, aluminum in the wires becomes very fragile, and as a result, it can be damaged by the slightest touch. In addition, aluminum is also very afraid of corrosion, so even the smallest drop of water can greatly thin the wire and lead to accidents, even if the cable looks solid. It is difficult to solder aluminum, and contacts come out unreliable, and such work is very harmful to health. This metal is still used for power lines, but there the wires are renewed once every 20 years and more often, so all the negative sides do not have time to appear. In apartments, aluminum is now banned, and copper is used.
- Previously, a TN-C type power supply system was used, since it was necessary to quickly provide everyone with electricity, and resources were limited. Now a similar system is prohibited, and used safer TN-C-S, but nevertheless, in many high-rise buildings, the Soviet system was preserved, so the problem needs to be solved independently.
- Branch wiring - one more greetings from the past, and a similar system was used all for the same reasons as TN-C. Its essence is that other wires were connected in groups to the more powerful cable that entered the apartment, and the branches were in junction boxes. In this case, each made branch meant stripped insulation, the presence of twisting or terminals. At the same time, when using branch wiring, such shortcomings can be avoided, since each group has its own separate piece of cable in reliable insulation.


The main stages of electrical work
So, we have identified those problems that are worth paying attention to, and which are solved by replacing the wiring. In order to clearly organize our work, we outline the main stages of this event:
- drawing up a power supply scheme;
- development of a wiring system, its coordination and registration in conjunction with a power supply scheme;
- arrangement of temporary power supply;
- wiring;
- connection of all necessary devices, sockets, switches.
Before starting work, it is advisable to take care of arranging protective grounding to ensure maximum safety for yourself.
Now we will consider all the given stages of work in more detail.
Drawing up a power supply scheme
First you need to have a good look at the apartment and understand where the electrical appliances will be located, sockets, switches etc. Then we think over where the wires will go, and what they will be: two-phase, three-phase. On the diagram they are indicated by a crossed-out line: the number of dashes means the number of phases, the protective wire, as it is, goes separately and is not crossed out on the diagram. Looking at an example, it is easy to understand the principle of drawing up such schemes and sketching something similar for your apartment.
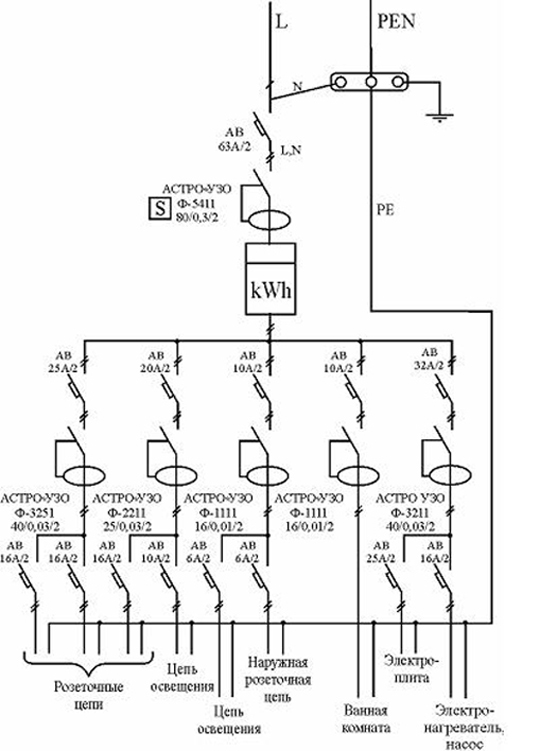
Power supply example
If you didn’t succeed in drawing, then you can give your sketches, for example, to a student or retired electrician, who for a small fee and in a short time will make the drawing. Turning to a specialist is an expensive pleasure, and there will be no less problems, since he will need all the initial data.
Energy rating
In order to properly organize the wiring and draw the necessary diagram, you need to immediately know the amount of electricity in the apartment. If earlier the limit was 1.3, maximum 2 kW per apartment, now with the abundance of modern technology this may not be enough, so we can safely put the value at the level of 4.3 kW. But even under such conditions, use a washing machine at the same time, boiler and air conditioning it will be impossible, but in apartment buildings will have to come to terms with this.
Drawing up a diagram for an average city apartment with an area of 40-100 m², you need take into account such nuances:
- main machine choose 25-32 A, depending on the area of the apartment;
- residual current device (RCD) provide for 50 A;
- two lines of wiring are laid in the kitchen 4 mm each2 with a gun on 25 A and RCD on 30 A;
- if there is air conditioning, then for it provide a 2.5 mm cable2 with a machine for 16 A and RCD for 20 A;
- in each room, it is necessary to provide outlet chains and chains for lighting, in the bathroom and the bathroom can only hold a branch of lighting. Required wire cross section - 2.5 mm2, automation is not required here, you can use the apartment.
Apartment power plan
Such a set of initial data should be enough to draw up an adequate power supply scheme.
How to draw a diagram?
If you still decide to draw an energy scheme yourself, then you can take the example in the picture as a basis. The top of the scheme can be safely copied to your version, and then if you are not sure of your knowledge and actions, you can familiarize yourself with regulatory documents on this topic. it Appendix to the Rules for the installation of electrical installations of consumers and GOST 2.755-87.
It is necessary to approach the preparation of the drawing very carefully, and a person with an engineering education will cope with this task quite simply. So, for example, if it is customary to designate an electric capacitor with two parallel lines 10 mm long and 0.5 mm thick, then these should be drawn exactly with them, even if you use the huge A0 Whatman paper.
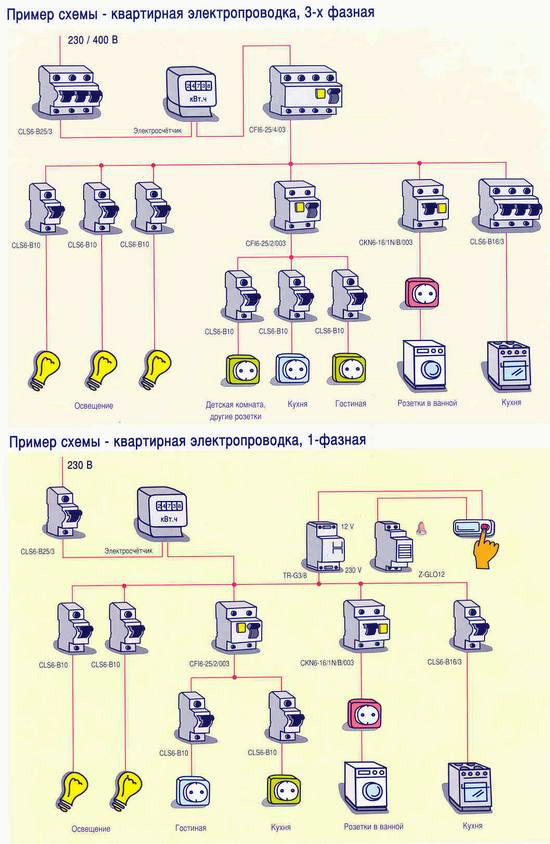
We draw up a wiring plan
The diagram drawn up at the previous stage becomes the basis for drawing up a detailed wiring plan on a scale with a mass of necessary designations and their explication.
An example of such a detailed plan is shown in the figure. When drawing up your own plan, pay attention to such things:
- for each room provide at least two branches of wiring from the counter: one for lighting, another for sockets;
- For bathroom depending on your plans, they provide a certain number of lighting points and output wiring for the boiler, if it is located there;
- on the plan, only branches leading to stationary electrical appliances and outlets should be designated. Moreover, in this sense, it is customary to consider stationary devices that are rigidly attached to their place and are not fed through a plug connection. therefore warm floor and we refer the boiler to stationary appliances, but the washing machine and refrigerator are not;
- even though all elements should be displayed on the diagram, such trifles as an extension cord leading to the balcony or LED illumination of the kitchen working area can be omitted. Such details often only annoy the inspectors. And even the most competently designed scheme may not pass the test;
- balcony and loggia - This is generally a separate issue. Separate branches should not be laid there, and all devices located there should be powered by outlets located in the room. If nevertheless such an organization of posting is necessary, they do not need to be indicated on the diagram, since this is a violation of the above Rules.
To simplify the whole process of drawing up a plan, you can take as a basis the plan of the apartment, which is developed by BTI or DEZ. It can be scanned: if it is large, then scan in parts and glue in Photoshop. If it was marked on it old wiring and the location of electrical appliances, then carefully remove all this with the same photoshop, and new designations are best drawn using a vector graphics editor, for example, Corel Draw. An important point: save the vector file, since the created plan can be returned for revision. Now it remains to divide the image in the same Photoshop into several parts, print and glue it if the plan is large.

Wiring plan example
Also, while working on my plan, take into account some tricks. So, for example, in adjacent rooms sockets can be arranged on the same level: this way you can save cable and pipe, and feed two rooms with one branch. If the apartment has a “tram” layout, then in the room that is located farthest from the meter, it is permissible to feed one group of outlets from another - this can save a little cable. Lamps of the sconce type can be powered from outlets, but for the ceiling it is necessary to provide a separate branch. If the interior solution involves the presence of spot lighting, then on the plan it is indicated as a chandelier, and the wiring for it is displayed in the center of the ceiling, and then it is decided during installation how it will be more convenient to organize all the details.
When the scheme and plan are ready, you can bring them for inspection to the energy services, which must check the created drawings and approve them.
Electrical equipment in rooms
To make your plan as accurate as possible, you need to carefully consider all the locations of electrical appliances, so that each user in any room is comfortable, and so as not to ruin the finish, correcting their own mistakes. Since the tastes, requirements and layout of the apartment are all different for us, there can be no universal rules and regulations. But for each room there are several tips that will help you organize your space correctly.
Bathroom
 It is the bathroom when laying the wiring you need pay special attention. Firstly, increased humidity is constantly observed here, therefore the risk of electric shock increases, and secondly, the resistance of the steamed person’s body after taking a shower decreases, so the effects of electric shock become more significant. In addition, everything in the bathroom is most often located in such powerful electrical appliances as a boiler and a washing machine, they work in conditions of elevated temperature and humidity, and the risk of malfunctions and electric shock again increases.
In order to reduce the possibility of unforeseen consequences, sockets in the bathroom are installed through an RCD, but even in this case there is no absolute guarantee that it will work immediately after a malfunction occurs. However, the installation of an isolation transformer will not give the best results, in addition, it is also a rather complicated matter.
To reduce the risk of electric shock in the bathroom, the Rules recommend using only a ceiling lamp, and then in a waterproof housing. Following this logic, it is not difficult to do the following conclusions about the organization of wiring in the bathroom:
- the boiler cord must be replaced with one so that it reaches the outlet in the next room;
- You can use an extension cord for three sockets with a figured hole for hanging on the wall and grounding contacts. It is equipped with a three-core cord;
- extension lead wires lead to the next room, provide with euro plugs, lay in a box, which is located at the very skirting boardsso that he does not catch the eye;
- the extension cord itself can be hung on a self-tapping screw or dowel, the time spent on the boiler plug in the sockets is not regulated by any rules, so if it is constantly there, then you will not violate anything, and you do not have a dangerous outlet in the bathroom, but just an extension cord;
- the other two extension sockets can be used for a washing machine, hairdryer or other devices;
- The extension cord plug is plugged into an outlet in the next room and can be disconnected if necessary.
With the help of such simple manipulations, it is possible to achieve that in the bathroom there will not be permanently exposed ends of the wires under voltage. If you also follow the simplest safety rules, then the risk of electric shock will be reduced to zero.
Restroom
If the bathroom in the apartment is combined, then only a branch can be drawn into the toilet to power one ceiling lamp. If the fixtures in the bathroom and toilet will be powered on one branch in series, then no problems with the electricians should arise in this case.
Kitchen
If the kitchen and the bathroom are located nearby, then there are two branches of wiring: for the kitchen itself and for the bathroom. If the kitchen and the bathroom are distant from each other, then we conduct the second branch of the wiring into the room adjacent to the bathroom. But since most often these two rooms are adjacent, we will consider the option that the two branches of the wiring go exactly into the kitchen.
 For your own needs of the kitchen, it is best to provide not one, but two triple sockets, since there are many electrical appliances. In almost every kitchen, an oven, a combine harvester, spotlights, and sometimes even dishwasher. By the way, spotlights are sometimes recommended to be placed on a separate branch, but this is not economical, and does not comply with the above-mentioned Rules. The use of other outlets can also be found: they will be powered by a refrigerator, microwave, and also an extension cord, which is necessary for temporary connection of a vacuum cleaner, toaster, mixer, blender, etc. The extension cord is hung on a wall or cabinet for ease of use.
Corridor and hallway
In the hallway and corridor, there are two branches of wiring: for outlets and for lighting. Little trick: if the corridor is very long, then at the beginning you can use a sconce that will be powered by a wall outlet, and at the end already hang a ceiling lamp attached to its branch.
Children's and other rooms
In child care facilities, it is customary to equip all sockets and switches at a height of at least 1.8 m. But since the child’s room is still not a child’s institution, the more the child will grow up, and the location of the sockets will remain the same, so it’s best to temporarily use a socket with a protective disk to protect the child from possible experiments.
In the remaining living rooms, all the same two branches are brought out to power outlets and lighting, as well as one additional. In general, to understand how many wiring branches you need for all rooms, you need to multiply the number of rooms by two and add one. So, let's say you have a three-room apartment: an illumination branch, an additional branch and a branch of lighting in the living room, an additional branch in the bedroom can be powered by an additional branch in the living room, the same goes for the nursery. An additional branch of the kitchen is powered by a bedroom or a nursery depending on the particular layout of the apartment.
Determine the height of the outlets
 The height of the outlets is not regulated by any documents, but nevertheless it is most convenient to arrange all of them at a height of 25-30 cm: it’s convenient to use and they don’t catch your eye. The only exception is the outlet for the air conditioner, which can be made a little higher so that the wire does not stretch across the entire wall. And one more thing: do not try to make too many outlets, two groups in one room will be enough if you use triple outlets and extension cords.
Necessary tools and materials
Necessary tools
- hammer drill with the necessary nozzles: a bit for concrete, a core drill, a drill for concrete, etc .;
- soldering iron;
- test multimeter and phase indicator;
- Bulgarian;
- flashlight;
- portable electric lamp;
- pliers and screwdrivers (the presence of insulated handles is mandatory);
- mounting knife;
- level;
- cord for creating a route of gates, spatula;
Necessary materials
- terminal blocks. Our wiring method eliminates wire soldering and reduces the risk of short circuits. Here, all the connections are made in the input shield on the terminal blocks, which need to be purchased in the amount of 3-4 sections (each section has 10 contacts). Pay attention to the material of manufacture: polyethylene is not very suitable, and all the rest can be safely used;
- sockets. Here it’s just for you to choose, since any boxes will do, however, pay attention to the presence of protrusions on the outside so that you can keep them in the alabaster;
- cable. In order to save money, it is better to choose a single-core cable, and the advertised NYM does not meet its high price and is simply contraindicated for use in raw concreteand there’s no guarantee that the walls will never get wet. Therefore, it is better to purchase domestic VVG or PUNP;
- corrugated hose: it is better for them to replace old pipes. It is better to tear off the latter without regret, since it is almost impossible to reuse them: the cable with double insulation does not fit there, often in the corners the pipe is strongly bent and flattened. Therefore, it is better to hand it all over for scrap and partially pay off the purchase of a corrugated hose. It is better to choose metal as a material: a corrugation made of PVC, decomposes, emits toxic gases, and if you ground a metal, then it has no drawbacks at all;
- the input shield must be such as to fit in the desired number of machines, RCDs, terminal blocks and wires;
- alabaster;
- cotton tape;
- conductive paste.
Wiring Replacement
Repair makeshift
When replacing the wiring, the main thing is to make sure that you can supply all the necessary tools with electricity. To do this, we need a piece of wooden plank or polystyrene, where a socket for two or three sockets, an automatic machine for 16 A and a wire with a cross section of 4 mm are attached. You need to take care of the presence of an extension cord with a long cord, so that it is enough for all rooms.
Now the most crucial stage: after the apartment is de-energized, you need to ditch the dose near the meter, remove it and bring out all the wires to which the temporary bar is connected. Everything needs to be carefully insulated, then the temporary hut is attached to the wall, and from then on, you can begin to work.
For this phase of work better to invite an electrician. But if you are sure that you can cope on your own, then follow all safety rules, take tools only by insulated protrusions, do not touch exposed wires with body parts.
Shtroblenie walls and fastenings of sockets
 In order to carefully hide the wires, in the walls you need to make small recesses - strobes. They must be strictly vertical or horizontal, since inclined ones are the cause of accidents and injuries. A horizontal gate is made almost under the ceiling, 1 m from it.
It is best to gouge walls while standing on construction gantries. A stepladder is also suitable, but the side stops become mandatory so that when working and tilting to the side there is no chance to fall along with a heavy constantly rotating tool. The process itself is very noisy, dirty and dusty, so the time of its implementation is best agreed with the neighbors and scheduled for the first half of the working day. Strobing is carried out strictly according to the created plan.
The strobes are first made a grinder to the depth of the corrugation, the thickness in this case is equal to the width of the perforator bit. Then the required thickness is compensated by knocking out the groove with a bit. Then the grinder cuts the corners inside a bit and creates a hole so that the corrugation fits in as much as possible and smoothly bends.
Now it’s up to the sockets: if the walls are brick, then the holes for them can be created using a crown, and for concrete walls a chisel will be more effective. The bit is also used to create the desired recess for the input shield.
Some under the switches knock out a double strobe, but you can do without this if you use a corrugated hose, where two wires are placed.
Cable routing
 The most important and climax step in replacing the wiring is cable management. To do this, measure the required amount of cable and tighten it into a prepared, measured and cut piece of corrugated hose. Then we arrange the prepared wire with the corrugation in the strobes, and the ends of the cable must be brought into the socket, which is placed on the alabaster. After the wires are wound, the undergrowth is dominated by alabaster to the required level. Alabaster is also used to cover strobes with corrugation through each meter.
When the work in all rooms is completed, you can connect the ends of the corrugations to the input shield and grease them with conductive paste. Now they can be grabbed with a tin clamp on the screw. And the latter must be connected to the grounding terminal of the shield with a piece of protective wire.
Now you need to attach visor to the wall and outline the attachment points: they are drilled, and then dowels are inserted there. Then we disconnect the temporary hut, having previously disconnected the apartment. Then it is necessary to introduce the counter wires and the protective wire of the apartment into the shield, the protective wire itself is connected to the shield body. And only now you can put the shield in place and attach it to the wall, do not forget to carefully insulate the meter wires, and then put it into the shield body.
While the apartment is de-energized, you can do plastering to make the gates almost invisible.
Wire colors
For convenience, all wires differ in color: zero is indicated in blue or blue, phase is brown, red, black or white, and the protective wire is yellow with a green stripe. Remember the simple truth: you can connect only one-color wires to each other. In order to avoid extremely sad consequences, do not create phase-to-phase transitions, phases to zero and turning the switch on to a zero gap.
Plastering work
When all the work is done, the time comes to put everything in order: plastering, painting the walls, wallpapering, etc. But do not forget that the sockets should be on the same level with the wall, so most likely you will have to stuff paper, foam rubber or rags in them. The shield and counter must be covered with plastic wrap, securing it to the edges of the frame.
In conclusion
 If you chose wallpaper as decoration, then after gluing them all the sockets will be glued. After the walls are finished, it’s easy to find these places and carefully cut along the contour.Then it remains only to put the appropriate switches and sockets.
Now it is time to assemble the power supply circuit on the terminal blocks in the shield, but so far it is not worth connecting the input from the meter. Before connecting each branch to the terminal strip, it must be checked by a tester for a short circuit. For some time you need to turn on the power of the apartment and use the indicator to find the zero and phase that go from the meter. When everything turned out, you can turn off the power and wire the corresponding colors across the terminal blocks.
It is necessary to carry out a repeated check for the possibility of a short circuit when the machines are working: turn off the machine, apply electricity to the apartment and turn on the machine. If everything is in order, then the work is done correctly, and you can continue the repair.
Do not try to carry out all the work without previously agreed plans and schemes: at the first check everything will be clarified and you will still have to legitimize your alterations, but in fact.
Remember that only people who are sufficiently versed in this matter can independently undertake to replace the wiring, can independently draw up a wiring diagram and energy consumption. Otherwise, an appeal to specialists will still be cheaper.

 Installation and replacement of wiring in the room: how to ...
 5 tips for choosing and calling a good electrician on ...
 TOP 9 tips for repairing an apartment in a new building
 6 tips for installing electrical wiring in a wooden house
 7 tips for choosing a power cable for a private house
 Bathroom Repair Steps
 7 tips for hiding wires in an apartment
 4 tips for finding hidden wiring in the wall
") 7 tips for choosing a corrugated pipe for ...
7 tips for choosing a corrugated pipe for ... Which heating radiator is better for an apartment, a private house
It’s interesting to become, but one thing is better not to put astro ouzo too much then trouble with it!