Do-it-yourself installation of a water heated floor: video, schemes, technology
Today arrangement warm floors - A great way to make your home warmer. Often, underfloor heating becomes not an additional element in the heating system, but completely independent. Among all types, the most popular is the warm water floor, which is the most economical and effective. In order to get a high-quality system of underfloor heating at home, it is better to contact companies that are proven and reputable, for example, Atmosphere of Comfort. But you can try to cope with this task yourself.
Advantages and disadvantages of water heated floors
Water floor heating is different several advantages, among which it is worth highlighting:
 low material costs for installation and operation;
- the floor over the entire area is heated evenly;
- you can heat the house a very decent area, but at the same time significantly save on payment for heating;
- lack of visible heating radiators - plus to the attractiveness of the interior;
- the ability to adjust the temperature yourself.
In fairness, it is worth noting that such a system of underfloor heating was not without some drawbacks, but most of them can be minimized with proper installation of the entire system:
- some difficulties in arranging the entire system of water underfloor heating;
- the need to use a water pump;
- there is a risk of leakage, and finding it can be very difficult;
- pressure in the riser slightly, but drops.
The likelihood of leaks can be reduced if you do not use metal pipes that quickly corrode. A great alternative is metal-plastic, polyethylene, polybutylene. All these are materials that can serve you faithfully for 50 years.
Preparatory work
 Before starting installation of a warm water floor, it is necessary to carry out all the necessary measurements and calculations in order to find out the optimal power. This indicator depends on many factors: the area of the room, floor, the quality of wall insulation, glazing area, etc.
If the apartment is located on the first or last floor, there is a balcony, a window to the floor or bay window, the walls are poorly insulated or it is planned to use thick ceramic plates as a floor covering, then it is better to provide a system of warm floors of a more powerful type.
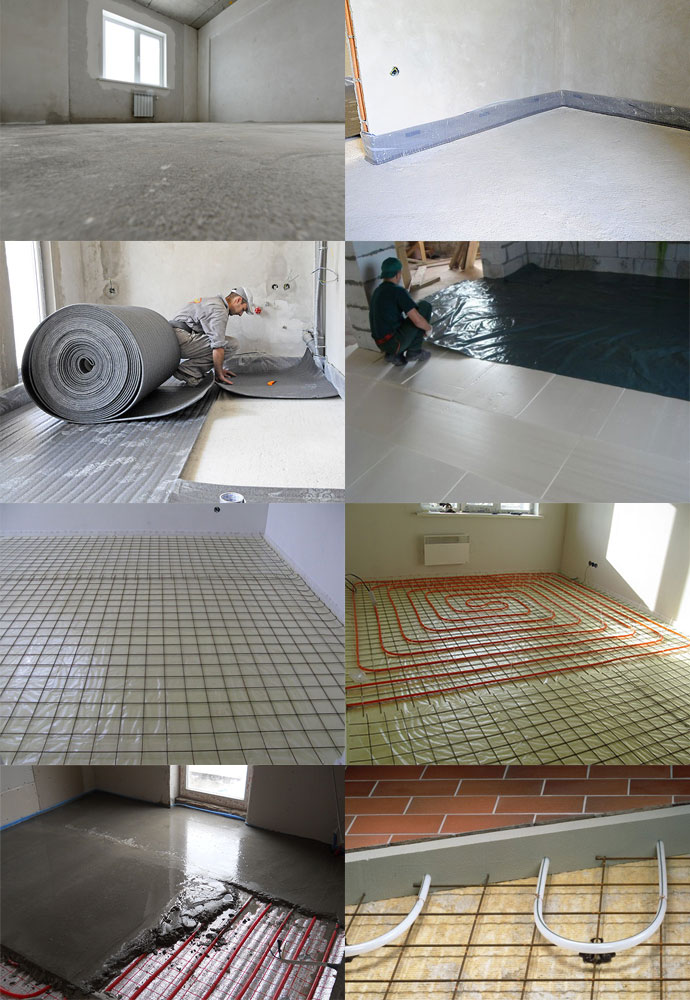
After this, the preparation of the base for laying the floor heating system itself is carried out. The old coating must be removed, and if there are floor differences of more than 10 mm, an additional screed must be made (you can use self-leveling mixes), otherwise then the heating system may not work correctly, and heating will be uneven.
Necessary materials
For arranging a warm water floor system necessary materials and tools:
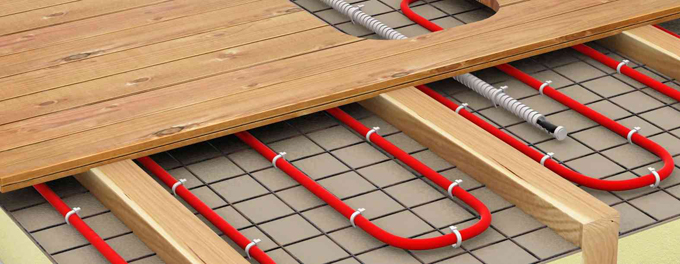
- pipes for underfloor heating - The first thing to take care of. They can be made of polyethylene or polypropylene. Polyethylene pipes expand less when exposed to heat, so they are preferable, but if the polypropylene pipes are covered with fiberglass, they will expand less.The optimal diameter of the pipes is 16-20 mm, they must withstand temperatures up to 95 degrees and pressure up to 10 bar;
- collector and shield for him. The collector should be in the same room where the underfloor heating system is mounted, so it is important to choose an aesthetic shield for it;
- reinforcing mesh;
- plastic clamps for fastening tubes to fittings;
- screed materials;
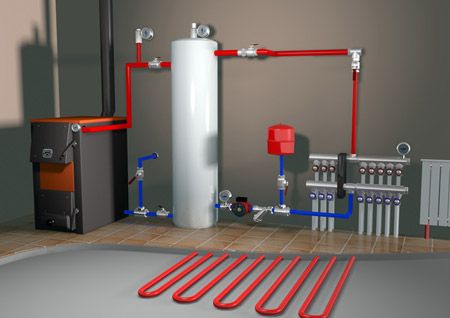
- a boiler in order to heat the coolant - water. Almost any boiler is suitable, it is only important that he knows how to heat water for 30-400C, it’s not always necessary that the floors be hot, because it will be impossible to walk on them. That is why the main factor when choosing a boiler for a system of warm water floors is the range of its working temperatures, so you can consider gas, electric, double-circuit, wood and other options;
- pressure pump, if it is not in the boiler;
- clamps for fastening pipes to the reinforcing mesh and fittings for connecting pipes to the manifold.
Types of technologies for installing a water heated floor
Water floor can mounted in two different ways:
- Concrete technology associated with some difficulties, and considerable time costs. But despite this, it remains quite popular due to its other attractive qualities. This method requires the installation of a concrete screed, in which the heating elements are mounted. The final flooring may only be installed after concrete completely frozen, and the duration of its solidification depends on the thickness and can reach 28 days.
- Flooring technology avoids dirty and "wet" processes associated with concrete laying and waiting until it hardens. Ready-made materials are used here, which can significantly save time and simplify the whole process. The reverse side of the coin is a great waste for the purchase of several layers of layered material. Depending on what material is chosen for laying, this technology can be polystyrene, modular wooden or rack wood.
Concrete screed for underfloor heating
Today this The method of arranging a warm floor system is the most common.
First you need to lay on the prepared surface thermal insulation layer, and you need to do this as efficiently as possible so that the heat from the pipes with the coolant does not go down, but goes only to the floor heating in the apartment. For these purposes, foam, foam or styrofoam is most often used, and its thickness should be from 30 to 150 mm, depending on what heat loads are planned. You can use special mats in which there are locking mechanisms, so working with them is easier, but they cost more.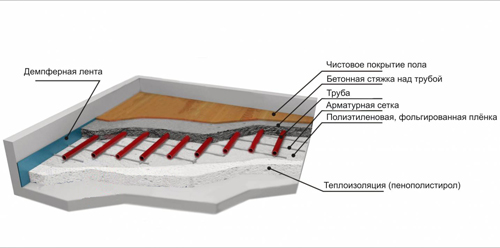
Experts advise choosing a heater, depending on features of the room and the role that underfloor heating will play in the overall heating system. So, if the underfloor heating is just an additional element of the home heating system, then foamed polyethylene will come off, but always with a reflective foil coating. If there is a heated room under the apartment, then sheets of expanded polystyrene 2-5 cm thick can be used. If the apartment is located on the ground floor, if there is a basement under it, then it is better to use a more serious insulation - expanded clay or polystyrene foam with a thickness of 5-10 cm. There are also special insulation for warm floors: they cost a little more, but they already have grooves for laying heating pipes.
As waterproofing layer use a plastic film that is laid on top of the foam. Next turn for damper tape, which is necessary in order to compensate for possible thermal expansion of the screed. It is laid around the perimeter of the room for the entire height of the screed for underfloor heating.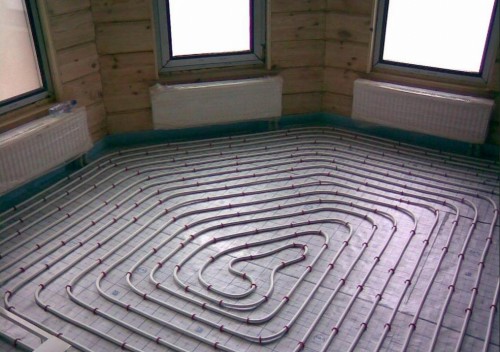
Then necessary reinforce prepared base for underfloor heating.To do this, you can use a grid with cells of 15-20 cm and with a cross-section of twigs of 5 mm. If there is a desire and need to obtain a warm floor “for centuries” and to strengthen the entire structure as much as possible, then reinforcement can be carried out after installation of heating pipes.
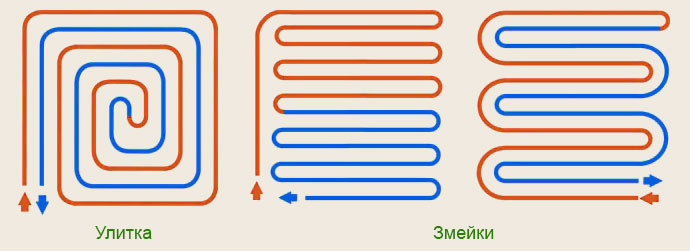
Installation of heating pipes can be carried out in several ways:
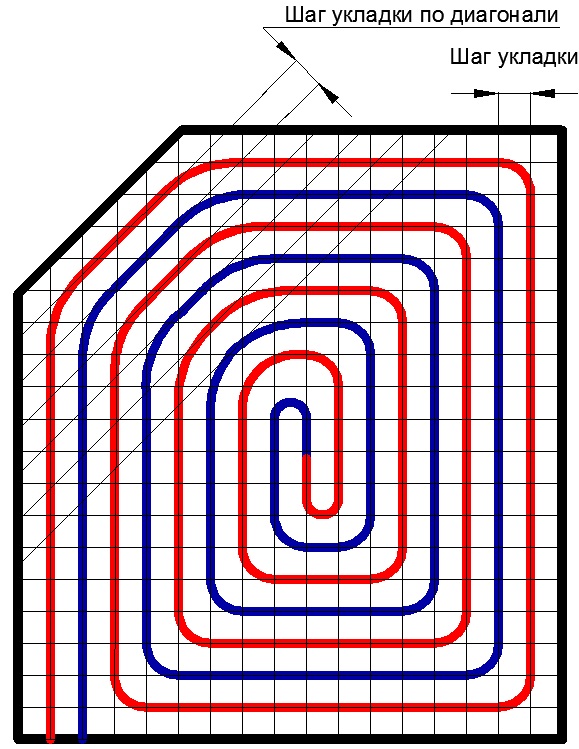
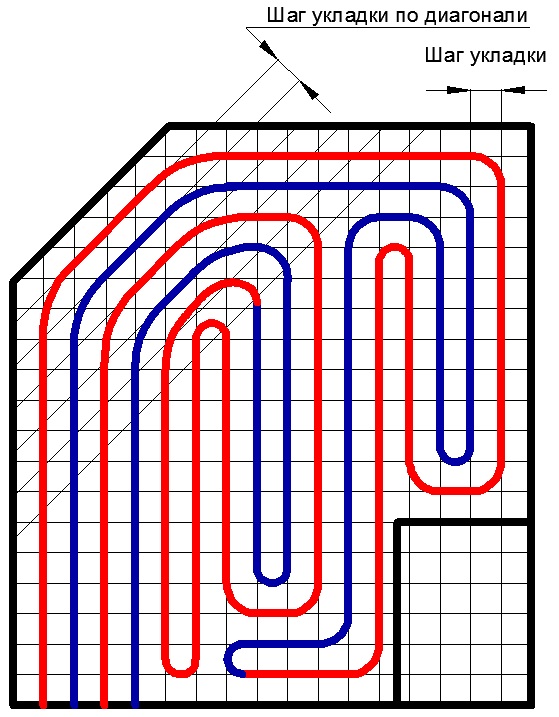
- spiral. This option is perfect for more spacious rooms, it allows you to perfectly distribute heat evenly on the floor, but also requires a more thorough approach. With this layout, pipes with hot and cold water alternate, which affects the uniformity of temperature distribution: here the cold zones are located next to the warm ones. The spiral way of laying pipes is also more advantageous from the point of view that there are fewer angles and turns, which means that it will be much easier to flow water. With this method of laying per square meter of floor area, it takes about 5 linear meters of pipes if the distance between the pipes is 20 cm. Near the outer walls, the distance between the pipes must be reduced to reduce heat loss and provide the room with maximum comfort. Spiral pipe installation is a more time-consuming process that requires accurate distances. There are software resources that allow you to accurately calculate the location of each coil of the spiral, depending on the area and configuration of the room;
- a snake. The pipe first passes along the perimeter of the walls, and then goes back in a wavy line. Installation of this option is simpler, does not require special calculations, less time-consuming, but it will be much more difficult to get an even distribution of heat;
- combined pipe laying combines zones with pipe laying in a spiral and a snake.
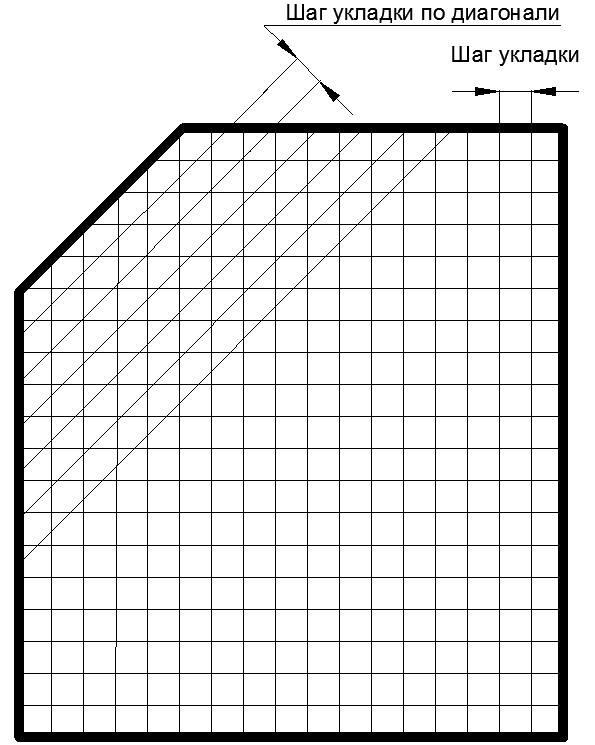
If the room is large in area, then you will have to provide several separate heating loops. Pitch between pipes depends on what effect you need to get: if the underfloor heating will be the only source of heat in the apartment, then this distance should not exceed 20 cm, if it is just an element of the heating system, then you can lay pipes in increments of 30 cm, but no more .
To independently determine the best pipe arrangementIt’s better to make a diagram in advance. This is convenient to do on a regular piece of paper in a box where, on a scale, taking into account all the nuances of the layout of the room, they draw up a system of future warm floors. It is necessary to take into account not only all the protrusions and recesses in the room, but also how the furniture will be located, or at least part of it, because it will not be practical to heat these parts. Examples of creating a spiral arrangement of pipes are shown in the figures, but people with certain experience will be able to correctly compose these. Therefore, the development of the entire system of underfloor heating with the determination of power, length and step is better to entrust to specialists, and everything else can be done with your own hands.
Pipes are fixed to fittings with the help of special clamps: this is a very simple process, and the distance between different fasteners should be about 1 m. Do not try to tighten the clamps too much: the pipes may expand slightly when heated. Places with expansion joints are additionally worn in corrugated pipes so that the heating pipes are protected as much as possible from possible damage. They begin to lay pipes from the walls, moving to the center or to the opposite wall.
The final point in the pipe laying process is their verification, or crimping. It is carried out already after the underfloor heating system is connected to the collector, as described below. It is needed in order to detect possible places with damage, leaky segments and replace them in time even before mounting the screed. Such testing is carried out for a minimum of 24 hours at a pressure of 3-4 bar.
When it is precisely verified that the underfloor heating system is tight, you can proceed to installation of concrete screed. Pour it to a height of 3-7 cm, in the end, to get the most even surface.To do this, it is better to use lighthouses, and already level them concrete mortar.
The screed will solidify for a maximum of 28 days, until the concrete gains its brand strength. During this period, it is impossible to include a system of warm floors. You can turn on the heating only after the screed has finally solidified, and not immediately at maximum power, but gradually increase the temperature over three to four days.
For screed use a special mixture for underfloor heating or sand concrete brand M300.
As flooring on top of underfloor heating it is better to use those materials that conduct heat best, and this laminate, ceramic tile or linoleum. If you plan to finish the floor parquet or laminate, it is worth paying attention to those options that can be used in the system of underfloor heating: about this manufacturers indicate the packaging.
Polystyrene underfloor heating technology
Advantage This method consists in the fact that there are no all dirty processes that are characteristic of concrete screed. At the same time, it is possible to significantly save time on laying a warm floor, and the height of the room is practically not stolen due to, again, the absence of a screed. Polystyrene plates here play the role of a reliable heat-insulating material, and this method is indispensable when the load of the concrete floor screed can not withstand, or the ceilings are already low, and those 10-15 cm that go to the installation of concrete screed can really save the situation.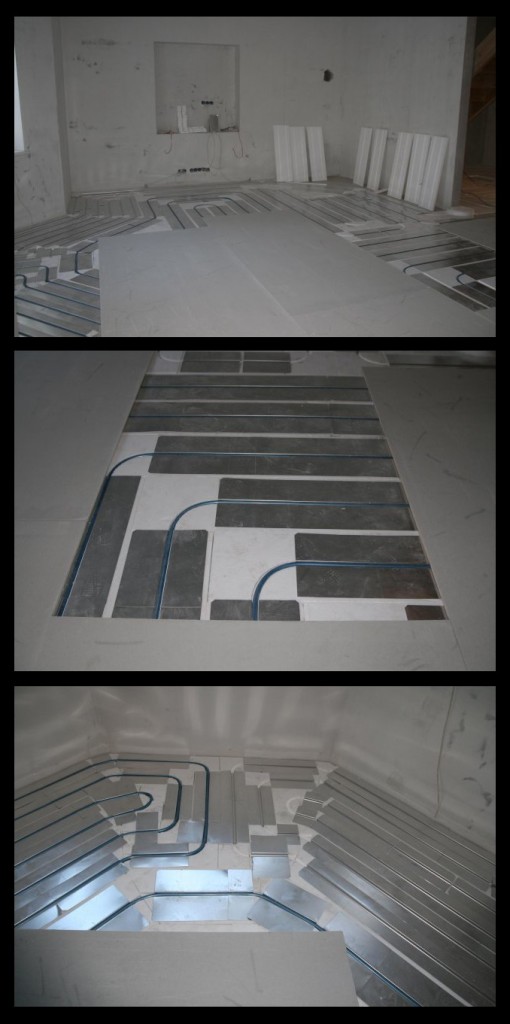
Polystyrene plates are laid on the prepared and leveled and leveled surface, and aluminum plates are already laid on them. They have special grooves for laying pipes, such plates should cover about 80% of the floor: thanks to them, heat will be distributed evenly. Heating pipes are laid in the recesses of the plates. On top of them lay sheets of gypsum-fibrous boards: one sheet is enough if the topcoat is used laminate or linoleum, but if parquet or heavy ceramic tiles are used, it is better to use two sheets.
Polystyrene technology is applicable on a concrete or wooden base. It will not work only if the house has no concrete floors.
Wood flooring technology
This method is indispensable. for wooden houseswhere concrete floors are absent altogether. Depending on some nuances, two options are distinguished: modular and rack.
Modular technology
This technology provides for the installation of a thermal insulation layer, on top of which it is laid fiber boards. They pre-cut grooves for mounting aluminum plates and pipes in the future. Then they install aluminum plates and fix the pipes in them with special latches. Aluminum plates here, as in the previous case, contribute to a uniform distribution of heat.
Gypsum-fiber sheets are laid over the laid tube system, and only then can the topcoat be laid.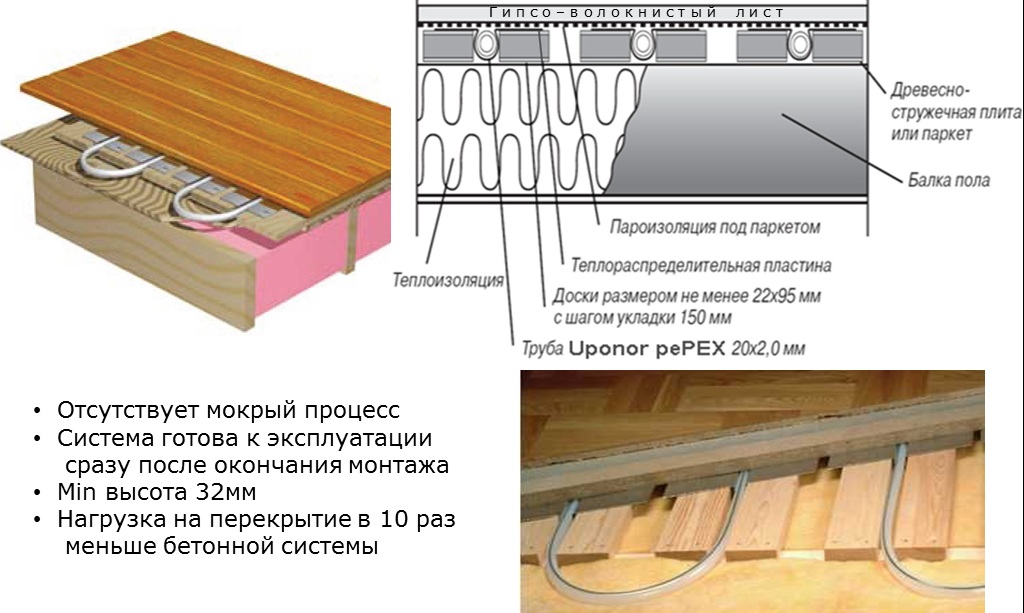
Rack technology
A thinner layer of thermal insulation is used here than in the previous method, so the mass of the entire system of underfloor heating is even less, which makes it possible to use a similar system on the second floor of a wooden house.
As a heater, mineral wool or polystyrene foam is used, which is placed between the floor beams. 2.8 cm wide rails are laid on top of the insulation, and the distance between them is 2 cm. Al plates with corresponding recesses are already laid in the prepared rack base, and pipes are laid in them.
At the end - laying of gypsum-fibrous sheets and finishing.
Collector Group Installation
General collector need to mount to the wall after the floor is pre-leveled so that the laid pipes can be connected to it simply and quickly and check the entire system. We will consider this stage separately.It is worth noting that the wall surface for optimal operation of the equipment should be perfectly horizontal, and for verification you need to use the laser level.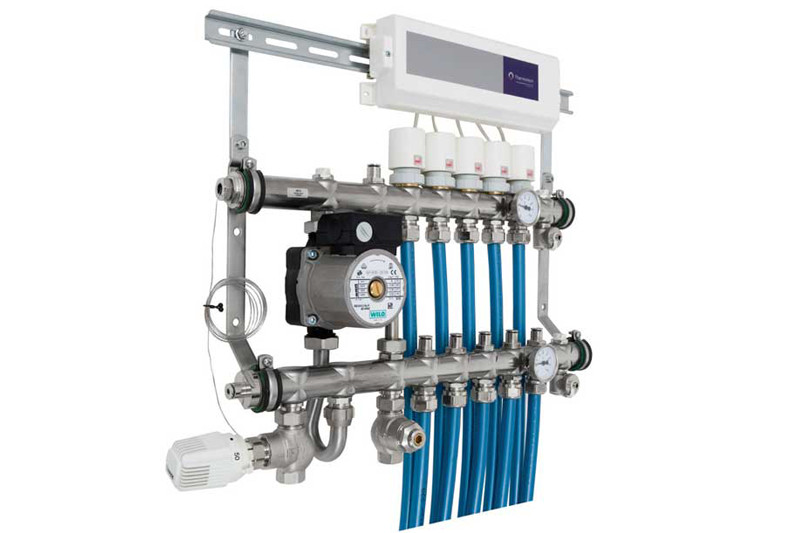
Whatever installation technology of warm water floors is chosen, the installation of a collector will still be required. It is easy to find it in the store, and with independent work it is better to choose a ready-made assembled collector with a shield: it is only important to know the number of conclusions, and this depends on the number of circuits. After installation, it is necessary to connect a supply and return pipe to it: the first goes from the boiler and carries hot water to the system, which transfers part of its heat to the floor, and then returns to the boiler through the return pipe, it is fed back to the boiler, where it is heated, and the cycle repeats. A pump for pumping and pumping water may be needed if one is not built into the boiler.
The collector box is installed in the same room where the system of underfloor heating is mounted, and they try to place it as close to the center of the room as possible and lower, near the floor. The collector cabinet is mounted on the wall or placed close to it, it all depends on what kind of water supply you have: open or closed.
Shut-off valves are attached to the supply and return pipes, which allow shutting off the water when heating is unnecessary, or when some repair work is being carried out. To connect heating pipe and shut-off valve, use compressor fitting. Now it is necessary to connect the manifold to the valve, and install an air vent on one side and a drain cock on the other. To accurately control the temperature of the water in a warm field, there must be special valves or even mixers in the manifold cabinet.
Finally
The final step in the installation of a system of warm water floors is the arrangement of the finish coating and the enjoyment of the work done. Properly equipped warm floors make it possible to do without repairs for a long time, and in winter it is comfortable indoors and even walk barefoot on the floor.

 7 tips for choosing pipes for a warm water floor
 TOP 12 + 1 of the largest manufacturers of water floor heating
 7 tips for choosing a warm baseboard: electric ...
 Choosing an electric heated floor - 9 tips for choosing
 TOP 16 largest manufacturers of electric underfloor heating
 Warm floor under the laminate: how to choose and install ...
 11 tips on which pipes for heating is better to choose: ...
 Which is better to choose polypropylene pipes for ...
 Do-it-yourself water heating: is there any benefit and ...
 7 Tips for Cross-Linked Polyethylene Pipes for ...
Hello. I built a bath, made a water heated floor from a metal-plastic pipe. Which heater do you recommend, which coolant? I do not want to connect to the bath stove.
Guys, I advise you to be very careful about the choice of a collector) Guess it will not be a warm floor, but one torment !!