9 do-it-yourself wooden crafts ideas for a summer house and garden + photo
Many ideas for inspiration and creativity can be found in a variety of sources. Resourceful people successfully adapt many seemingly useless objects and make real works of art out of them. Numerous such creations adorn country and garden plots and surprise guests. Why not learn to use those materials that are always at hand in any country, for example, wooden saw cuts, beautiful driftwood, small logs? Today we will consider 9 ideas for wooden crafts for garden and gardenthat you can do with your own hands and try to inspire you to create a new masterpiece. 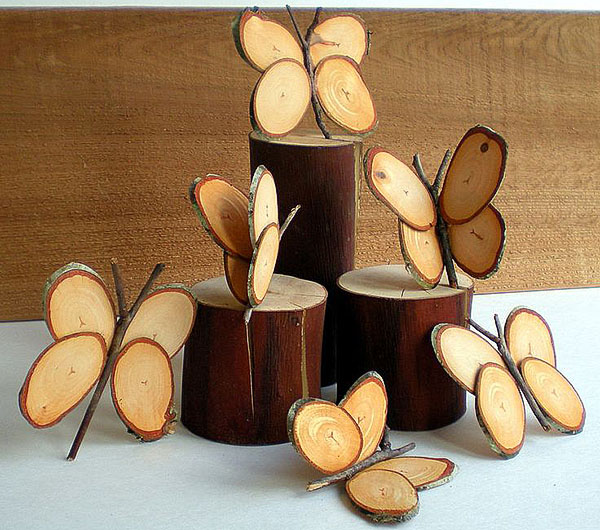
1. We decorate the site with wooden figures of birds or animals
Before we consider more practical ideas on the use of various wood materials, let's show a little imagination and decorate our site with unpretentious, but very cute little animals. From the most ordinary materials, at no cost, you can make a beautiful piece of decor for a flower bed and bring your child to the process. Let him figure out how exactly the wooden hero will look, what size he will be, and where he will live, and you just have to collect it from various fragments. We will make an owl family sitting on a branch.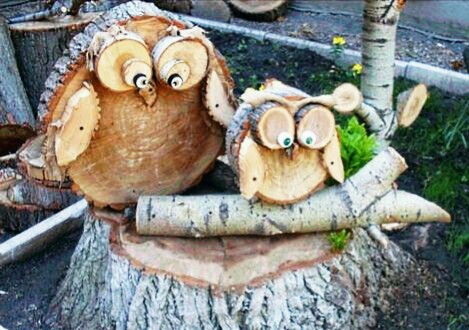 Us will need:
- First of all, of course, a sketch of the future crafts. Visualization is a very useful thing, with its help you quickly navigate in the amount of necessary material and its size.
- A wooden branch of medium thickness about 50 cm long;
- One large cut and one of medium size;
- Four small thin saws:
- Two small twigs or twigs;
- Two small saw cuts divided in half;
- Fasteners.
- Hacksaw.
Let's start with the big owl. Before you tightly connect the elements together, lay them out and see how it will look. You might want to change or add something. A large saw cut will serve as the body of a bird. On it you need to place two small saw cuts that will become eyes, and a knot that will be a beak. The craft looks more interesting and voluminous if the elements protrude slightly beyond the general contour. Wings can be of any shape, perhaps you will be able to come up with more interesting material for their performance. We took a small saw cut, divided it in half with a hacksaw, cleaned the edges of the bark and tried to make notches at the edges that mimic the feathers.
It's time fasten details on the torso. You can use small carnations and a hammer, but if you plan to do the craft together with your child, it’s better to use "liquid Nails". A smaller owl is made using the same technology. If desired, you can add a very small owlet. Then all the birds are attached to a branch, or to a stump. If you want to arrange them in the middle of the flowerbed, you can fix the branch on a wooden stick so that the structure is the letter "T" and towers above the green spaces. Unlike us, don’t forget that owls have legs. You can make them in the same way as wings or from ordinary twigs of a suitable shape.In addition to owls, there are many more simple figures in terms of manufacturing. Small rabbits with ears sticking up will look very funny. 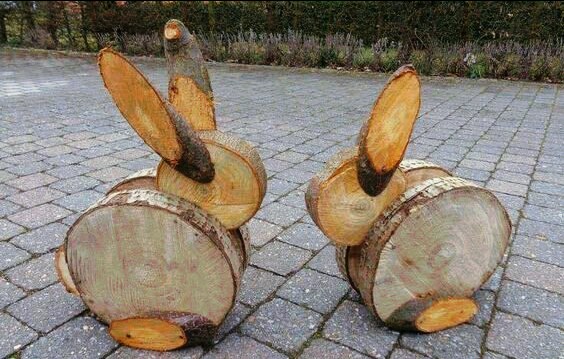
2. Crafts-mosaics for the soul
Surely in your country or garden plot there is a place in the house or on the street, or pergola, which I want to somehow decorate, but at the same time make it unusual. We offer to decorate any surface with crafts in eco style. Essence The method consists in laying absolutely any pattern or image from saw cuts of a tree of different sizes. Us required:
- Plywood sheet;
- Liquid Nails;
- Varnish;
- Jigsaw or a hacksaw;
- Many thin cuts of different sizes.
To start come up with a drawing which will delight you and cheer you up with your appearance. Now you need to transfer the sketch from paper to a sheet of plywood, keeping to scale. When the drawing is ready, attach it to the place of attachment and evaluate the size. Perhaps the craft will be too bulky or, conversely, so small that it gets lost against the background of a long wall. At this stage, this is fixable. After adjustment, you can proceed to cutting the plywood base. Now it remains to glue the wooden circles with glue and enjoy your work. 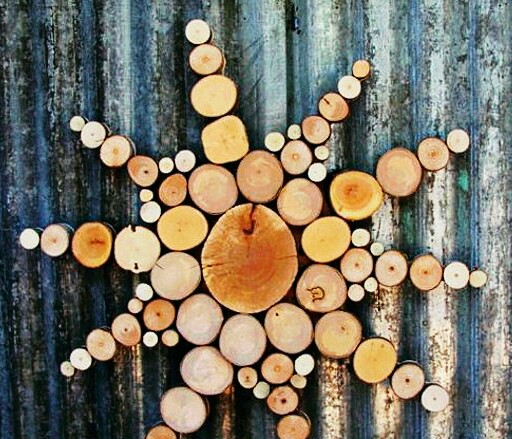 Try to select fragments so that between them there are minimal gaps. This will positively affect the finished product. To protect wooden under the tree, after the glue has dried, open it clear varnish. You can experiment a little and make some details colorful, you can use decorative glass pebbles or sea pebbles besides cuts. You can make the composition voluminous - first glue the main layer, and then glue the following parts in a checkerboard pattern, adding smaller and smaller fragments.
If you have in the country old mirror by the same principle, you can arrange it in a beautiful frame. The mirror must be glued in the center to the plywood sheet, leaving the edges free for attaching the saw cuts. Usually, if the mirror has a round shape, then the frame repeats its contour. And you try to use the opposite method - enclose a round mirror in a square frame and see how unusual it will become after reincarnation. 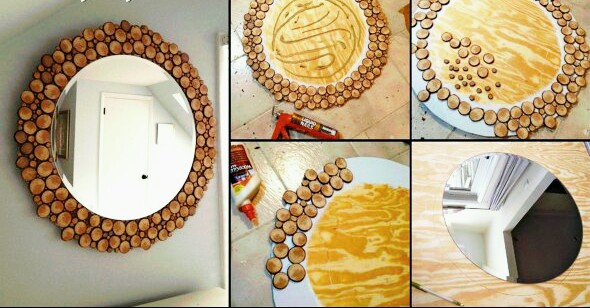
3. Useful little things
Without exception, everyone drinks tea in the country, prepares lunches and dinners and gathers in the family circle. The apartment has all the necessary little things that will make this process as comfortable as possible - various tack, coasters and more. At the dacha, hands usually don’t reach such trifles, why the surface of the table or tablecloth suffers when a hot pan or teapot is placed on it. It's time to put an end to this and in a couple of hours to do a lot with your own hands hot coasters. Depending on their area of application, the shape and size is determined by your needs.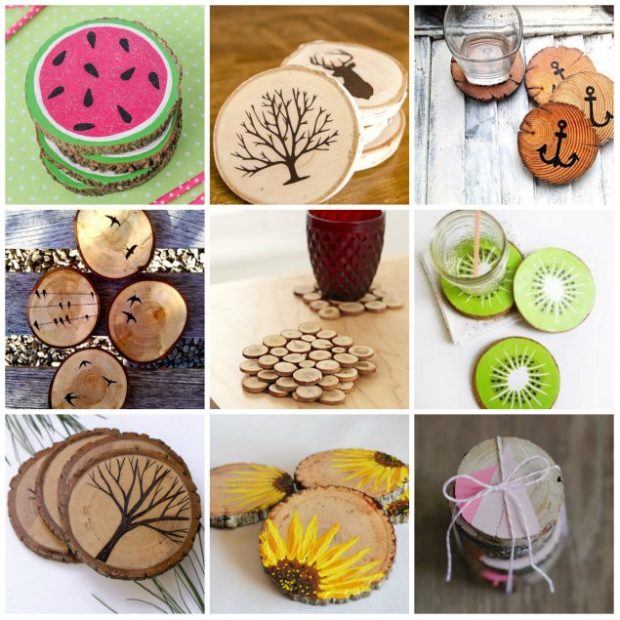 Consider a method of manufacturing the simplest stand, for which we will need:
- The foundation;
- Glue;
- Wooden circles;
- Hacksaw.
By the same principle as in the above paragraph, we cut the base from plywood and glue wooden saw cuts to it. Such simple crafts will easily withstand high temperatures. Small plywood base coasters fit under hot cups or a small kettle. A pan or pan is much more convenient to put on more massive coasters which also hold more weight.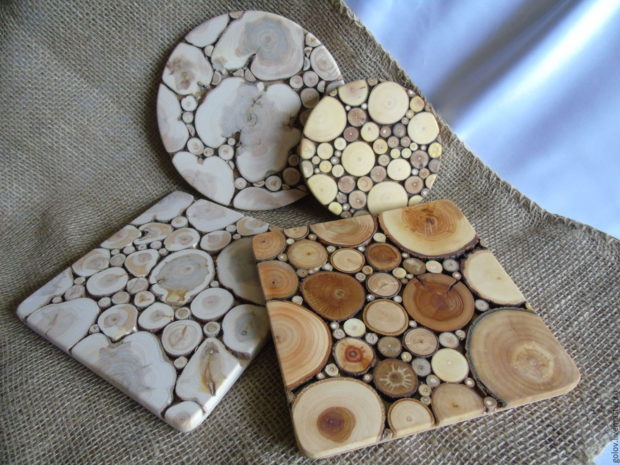 For their basis, you can use a large, but not very thick, cut. Koru recommended delete immediately, because during operation it will still crumble. The saw can be left in its original form only by lightly sanding it finely sand paper and opening with varnish. Can something draw on it, if you can - make an artistic burning and varnish. And you can just glue the entire surface in small circles. Butt ends it is possible to wrap thicker with twine or thin twine, having previously coated the surface with glue.So, crafts will look more neat and complete.
If you have patience and little skills with drillcan be made flexible stand very different configurations. Bead weaving skills are also useful. What to us required:
- Thick fishing line or kapron thread;
- Small wooden saw cuts with a thickness of at least 1 cm;
- Drill and thin drill;
- Vise
We will weave stand just like bead bracelets are woven. To do this, in each circle it is necessary to drill a through hole at the end. All parts are small; holding them with your hands is dangerous and uncomfortable. Therefore, it is necessary to clamp each circle in a vise. It is enough to use a drill with a thickness of 2 mm. If the process of connecting parts makes you difficult, look on the Internet for weaving patterns and act on their basis. Not necessarily the entire stand will be woven with one piece of fabric. It can consist of interconnected fragments, so much easier do the craft for the first time. After finishing work, you need to securely tie the edges of the thread or fishing line. In the latter case, you can carefully burn the ends with a match. 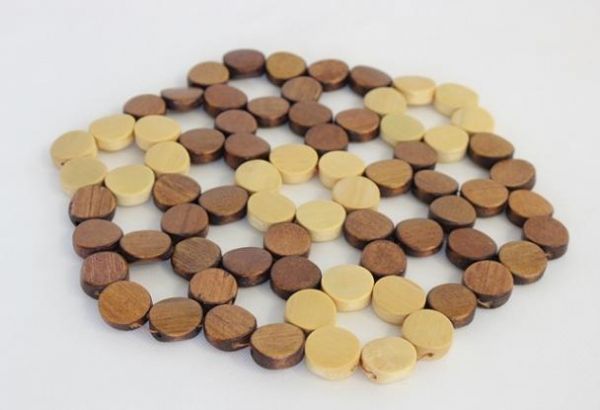
4. We take care of our smaller brothers - a wooden bird feeder
At any time and under any conditions, it is necessary to maintain humanity and love for nature, which will certainly answer you the same. That is why, coming to your garden or summer cottage, do not forget about the locals. Quick and easy to build original manger for birds from one single log. In addition to him, we required:
- Saw;
- Jigsaw;
- Semicircular chisel;
- Hammer;
- Rope;
- Two hairpins with a loop at the end;
- Self-tapping screws.
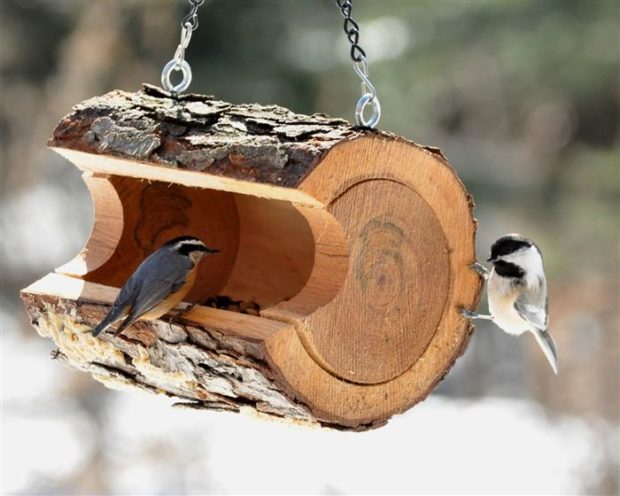
Log should be diameter at least 30 cm, otherwise it will just be inconvenient to work with it.
- On both sides of the log with a chainsaw we saw off circles with a thickness of about 1.5-2 cm;
- Along the entire length of the log, it is necessary to cut a wedge whose angle is approximately equal to 45 °;
- Remove the wedge and make many transverse and longitudinal cuts in the remaining interior of the log, not reaching the edges along the contour up to 5 cm;
- Using a hammer and chisel, remove the filed core;
- It should turn out hollow inside log with a triangular window;
Try to align the inner surface as much as possible, you can grind with coarse sandpaper. Now you need to do side walls so that the feeder is not blown by the wind, and bird food is not carried throughout the district. Yes, and water, therefore, will fall into the feeder much less. We will use those two saw cuts that were cut off at the very beginning.
- Attach them to a hollow log and from the inside use a pencil to transfer its outline to a saw cut;
- Saw out the intended part with a jigsaw;
- Insert the plugs and lock them with screws;
Now you need to take care of fixture. For this, mounting loops are suitable, which are screwed on top of the feeder on the sides. At this stage it is important arrange hinges right, so that the feeder does not lean forward and the food does not spill out. Find the optimal position. It remains to attach a rope or metal chain to the hinges and hang it on a branch. It will be very interesting for you to observe how the birds behave.
5. Original and simple clothes hanger
There is a mass of self-made wooden hangers - from boards, from saw cuts with hooks, just from driftwood of suitable shape and size. But we decided to examine in more detail the simplest, but very unusual way which will definitely appeal to you. We will make a hanger from small logs with knots that will be framed. Us required:
- Two long and two short wooden boards;
- Whole logs with knots;
- Saw;
- Plane;
- Varnish;
- Self-tapping screws;
- Screwdriver.
The toolbox, of course, is not the easiest, but it is only at first glance.So that the finished product does not seem too bulky and does not take up much space, we recommend cutting wood tall 15-20 cm. A knot must be present on each of them, the thickness of which must be at least 3 cm so that it can withstand the load. Also, do not choose too curved logs, otherwise they will protrude too much beyond the side frames and spoil the overall picture. Thickness elements of a wooden frame depends on the thickness of the logs you found. For example, if the diameter of the log is 5 cm, then the width of the board must be selected at least 10 cm. After assembly, you will have only 2.5 cm free before and after the logs.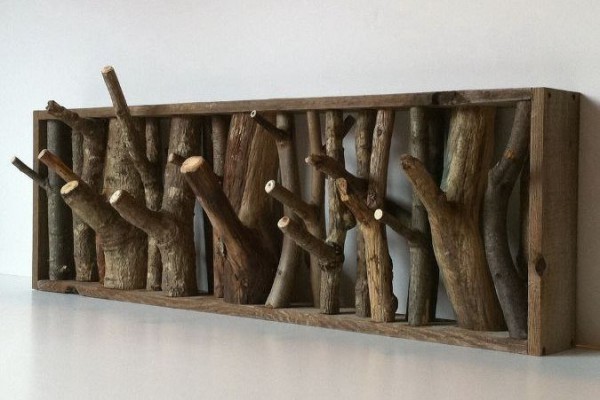
Preliminary cut firewood on workpieces with an allowance in height. The ends of the logs should be flat to fit on the upper and lower boards with minimal gaps. You can align the ends with a planer. But if you manage to cut more or less evenly to the same size, you can immediately varnish the surface. Now necessary enclose logs in frame. It will be most simple and convenient to do it as follows:
- Put the bottom board on the end on a flat surface;
- Place the side boards on the sides and make markings for future fasteners. Be careful at this point. there is two options - when the side boards are on the lower bar, or when the lower bar is enclosed between the side. The latter option is preferable. Firstly, in this way, you will hide the ugly ends of the bottom board, and secondly, it will be much more convenient to fasten the elements together;
- In marked areas, you need to make a preliminary drilling to make it easier to screw in a self-tapping screw;
- At this stage, you will need help, since it is very important to adhere to the perpendicularity of the faces;
- Two mounting holes on each side are sufficient;
- Pay attention, now we are assembling the structure without the upper bar;
After you screwed the sidewalls in the bottom board, you can proceed to fasten the logs. It is desirable to arrange them in the center. You can draw a line on the bottom board and try to stick to it.
- Turn the frame over and place it on the side walls. Given the diameter of the logs, drill the appropriate number of holes in a line. To facilitate the work, you can drill holes into the logs, trying to get into their center. It is recommended to do this only with one side. By screwing them to the bottom board, you will still have the opportunity to combine the hole in the bar with the hole in the end of the log. When it comes to the upper bar of the frame, all the elements will already be rigidly located on the base.
- Starting one log under the frame, fasten them with screws.
- Turn the future hangers back over, cover the structure with the last length of the board and screw it first to the side faces.
- Now screw one screw on top of each log with a screwdriver. Highly important get into the body of the log with the top board. Then the design will be reliable and can withstand heavy loads.
One more an important point which should be considered. Since we fix the upper and lower parts of the frame between the side slats, their length should be equal to the length of the logs + two thicknesses of the long boards. Fasten such a shelf very simple.
- Make a few reamers in the end of the upper board with such a diameter that the screw head enters the hole.
- Screw the appropriate number of screws on the wall, keeping the same distance as on the hanger.
Now hang the shelf and enjoy its extraordinary look.
6. A bed for giving from a rotten deck
Perhaps the housing and communal services after the planned work left in your yard sawn into large decks mouldering poplar, or you yourself sawed off an old tree in the country and found that inside it became almost empty. Of course, such material is not suitable for firewood, but for useful handicrafts - what you need! From such a crumbling stump we will make full and unusual garden beds.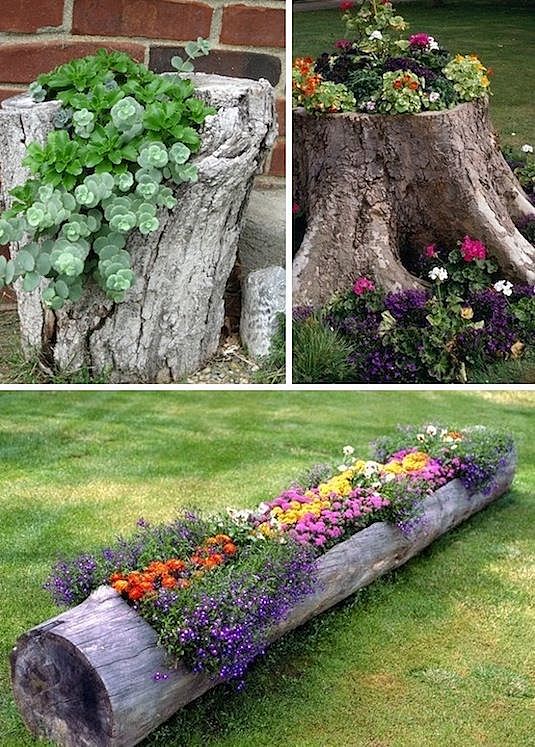 Us required:
- Decks - quantity at will;
- Ax;
- Hammer;
- Soil substrate;
- Unpretentious care flowers or plants.
You will be lucky if almost the entire inner part of the trunk has turned into dust, preserving only the outer contour of a small thickness in integrity. As a rule, this happens rarely, so you will have to personally remove the excess from the internal cavity. You need to do this as follows:
- Pre-draw a contour to be followed in order to leave walls about 5 cm thick;
- Now set the ax on the line and hit it hard with a hammer;
- The work is not difficult, but requires the use of force, so use reliable tools that will not break in the process and do not injure you;
- Be sure to wear glasses to protect the organs of vision from small slivers that will fly in different directions;
Do not strive to chop off a large piece of wood at once, the work will be much easier and faster if you chip small chips, moving from an existing cavity to the outer contour. 
When the work is completed, you can give the flowerbed more well-groomed look - remove the bark, clean the surface a little, soak special solution from insects and moisture and open with varnish. After drying, set the flower beds in the desired place, cover the ground and plant the plants. If you set the pot on a prepared pillow from sand and gravel, excess moisture after irrigation will be quickly removed, preventing premature rotting of the deck.  A much more interesting such composition looks from several flowerbeds of different sizes. And sometimes home-made flower beds made of wood may look like this:
7. Useful craft - a Swedish candle
For those who love cook in the country or on the garden plot various goodies in the circle of friends, come in handy so interesting breeding method and maintaining hearth like a swedish candle. To make it is very simple, and it can bring a lot of benefits, since its burning time is so long that you can not only boil water for tea, but also prepare a full-fledged dish. To make us would need very few items:
- Log;
- Saw;
- Ignition fluid.
The log must be put on the end and make two cross cuts. It is most convenient to work with a chainsaw. Cutting depth should slightly exceed half the height of the log, otherwise it will simply fall into four parts during combustion. If the log is wide enough, make three cuts so that they look like a snowflake on top. In the center of the obtained sectors, it is necessary to fill in a flammable liquid. After setting fire, be careful - a rather high and strong flame will burst from the center of the deck. 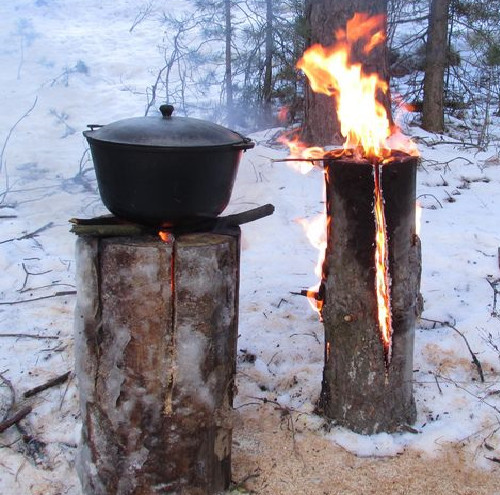 To install the vessel on the end, use moist branches that will simultaneously provide oxygen to the ignition site. This method of lighting a fire is useful in areas that are not equipped with bonfires or where there is no furnace for cooking in the house.
8. For fun leisure - wooden “Tic-tac-toe”
What to do after a hard day at the cottage in the circle of close or close friends? There are plenty of options, of course, but we suggest recalling that the game beloved by everyone, which many have symbolized with childhood, is tic-tac-toe. It would seem, well, what’s special about this game, and the fact that we make it yourself not only a field with markup, but also chips for moves! So we need:
- One saw a large size;
- 18 small cuts:
- Varnish;
- Burner or paint;
- Hacksaw;
- Sandpaper.

A large saw cut will serve as a playing field. To do this, it is necessary mark up in the form of a field 3 × 3 cells. You can do this with a wood burner, or you can use acrylic paint. After drying the paint, it is necessary to cover the surface with varnish. Now need prepare chips.
- A branch about 3 cm thick is suitable, which you need to saw with a hacksaw into circles, about 1 cm thick.
- In general, six “crosses” and “zeroes” are enough for the game, but the chips may be lost, one in the process may not work, etc. Therefore, it is recommended to do with a margin.
- The “zeroes” do not need marking, but on the future “crosses” on both sides you need to draw the corresponding symbol.
- First you need to align the surfaces after the hacksaw, rubbing it on sandpaper.
- When you finish burning or drawing badges on the chips, protect the surface with a layer of varnish. This may not be done, but in this way the game looks more civilized and it is pleasant to pick it up.
After drying the varnish, you can enjoy the unusual stylization of the usual game for everyone.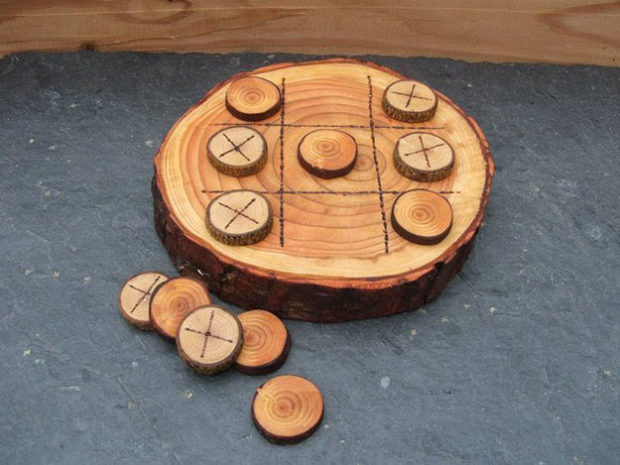
9. Fancy garden paths
At any country or garden site, there is a must paths and paths. In the most common case, these are trodden earthen tracks. Concrete paths are more convenient, along which you can freely move in rainy weather. Someone laying on a sand cushion paving slabs, and we suggest going the unusual way and lay down garden tracks from wooden spilov.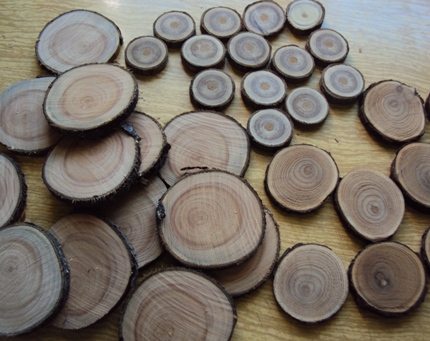 Everything is not as simple as it might seem at first glance. The process is quite time-consuming and requires serious preparation. Only with a responsible approach, wooden paths will last for many years and will look like new. Us required:
- A large number of cuts;
- Sand;
- Gravel;
- Drying oil;
- Wood preservative;
- Bitumen.
First thing you need prepare a place for laying down saw cuts. For this:
- Mark up future tracks;
- Remove the top layer of turf to a depth of 20-25 cm;
- Lay a layer of fine gravel about 10 cm thick;
- Top up with a layer of river sand 10 cm thick, moisten and tamp well.
Gravel and sand cushion is very important, it will contribute to the rapid diversion of water during precipitation or melting snow. Some experts recommend pave the trench geotextilewhich is then poured with a mixture of gravel and sand. Due to its features, textiles contribute to the removal of water from the upper layers, but does not allow crushed stone to mix with the soil. Before covering geotextiles, the bottom of the trench must be leveled. Now need prepare wood to styling. It will be subject to intense exposure to scorching sunlight, temperature extremes, high humidity and many other external factors. Exactly how you process and protect saw cuts determines the term of their operation.
- The height of the cuts should be 10-15 cm;
- Most durable material will be larch, slightly less durable - pine;
- To protect tree from rotting under the influence of moisture, it is best to soak the workpieces with hot drying oil, you can also use special antifungal impregnation;
- Dipping saw cuts in hot drying oil is quite dangerous, so be sure to wear protective gloves and use forceps;
- After drying is completely dry, it is necessary to cover the lower part of the workpieces with hot resin, which will be buried in the ground. You can use bitumen diluted in gasoline;
- If desired, you can artificially age the upper part of the saw cut by treating it with a solution of copper sulfate.
When the saw cuts dry well, you can proceed to their styling. Arrange them as densely as possible to each other and drive a little into the sand with a rubber hammer. Make sure that all the cuts are on the same level. It’s much easier to lay the track if you start with the largest elements. 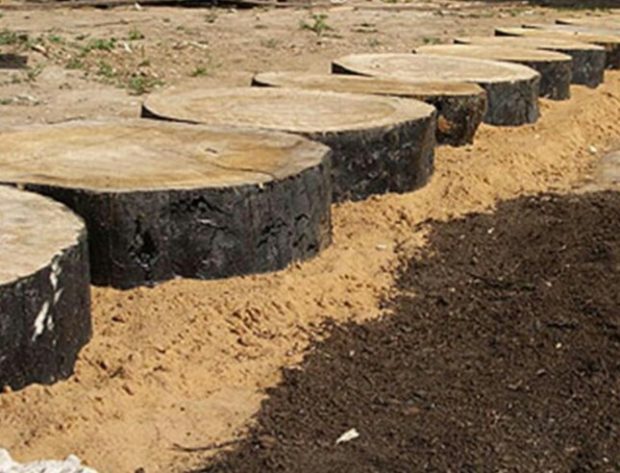 If you have enough patience, you can simultaneously lay out a certain pattern or alternate blanks of different colors. After laying, you have anyway gaps will remain between circles. They can be filled with sand, fine gravel or decorative finely divided colored soil. To give a special atmosphere, you can fill the space with spruce or pine needles.It remains only to carefully trim the excess geotextiles, and the wooden path is ready!
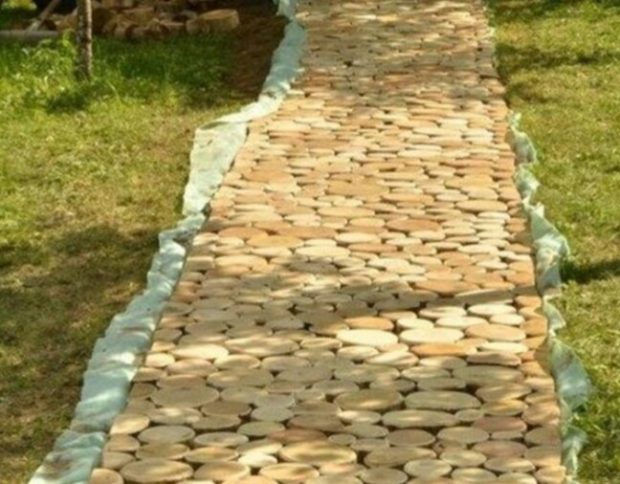

 DIY garden scarecrow: 5 interesting ideas
 How to make a dry stream with your own hands in the country: 4 ...
 11 tips for landscaping a small plot + photo
 Outdoor washbasin for summer house and garden: choose the finished one ...
 16 ideas for crafts from plastic bottles for giving + photo
 9 DIY DIY Craft Ideas for ...
 15 ideas for crafts from tires and tires for the garden, backyard and garden
") 9 interesting ideas for decorating a balcony (with photo)
9 interesting ideas for decorating a balcony (with photo) 40 ideas for crafts from wine corks for home and garden
 15 tips on how to make a lampshade / lampshade for a floor lamp ...