9 DIY DIY craft ideas for garden and garden + photo
The era of digital technology is growing at a crazy pace! Once CDs were considered the best storage media, and now gather dust somewhere in the garage or in boxes on the mezzanine. But some unknown force still does not allow us to get rid of them. Probably all this because of their attractive, shiny surface. If you can’t say goodbye to this beauty, we’ll share 9 really worthwhile craft ideas from old CDs for the garden and cottages, which you can do yourself.
1. Hot Stands
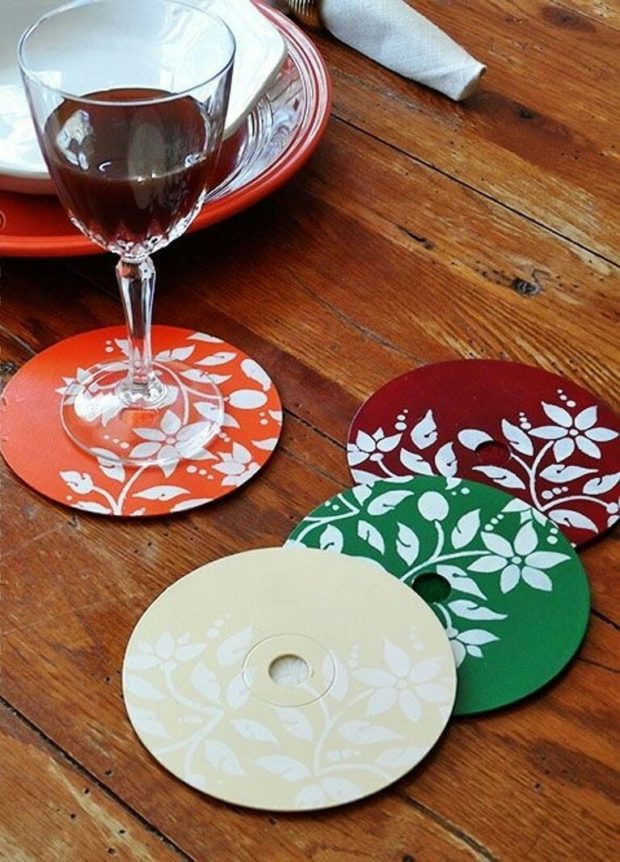
We begin our master class with a description of the simplest crafts, namely, coasters for hot cups or a teapot. This is a necessary thing in the household, especially when you consider how quickly it melts under the influence of a hot plastic tablecloth. But many have country house it is she who protects the surface dining table. Of options making coasters some. Depending on the amount of free time and the availability of materials, everyone will find an option to their liking.
- The simplest coasters look just like painted discs. Someone will want to paint the plate on both sides, someone will leave the shiny side untouched - the choice is yours. For these purposes, the most suitable acrylic paints. You can put a dense layer of paint on the surface, and then use a toothpick to “scratch” any pattern. Excess paint can be easily removed, and beautiful shiny lines will remain in front of you. You can immediately apply the ornament with freehand paints or use a stencil. After complete drying, you can safely put hot dishes on the stand. You can protect the paint layer with two balls of acrylic varnish.

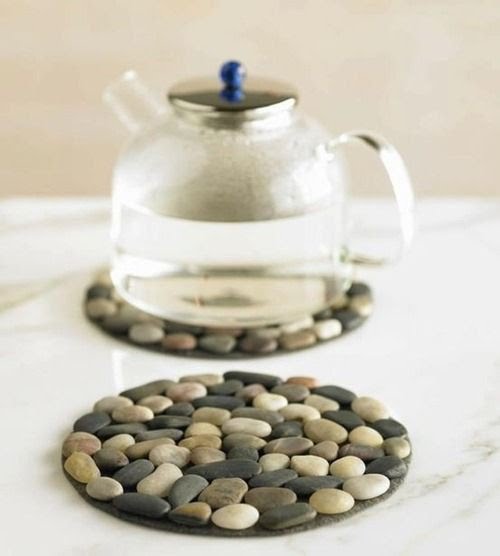
- The stand will be more dense and heat-resistant if a small sea pebble, glass beads or decorative pebbles are glued to it. An interesting way to decorate - whole coffee beans. Such lovely and beautiful objects will make tea drinking more enjoyable. You can fix the decor on superglue or using a heat gun. It is recommended to open the surface with varnish.
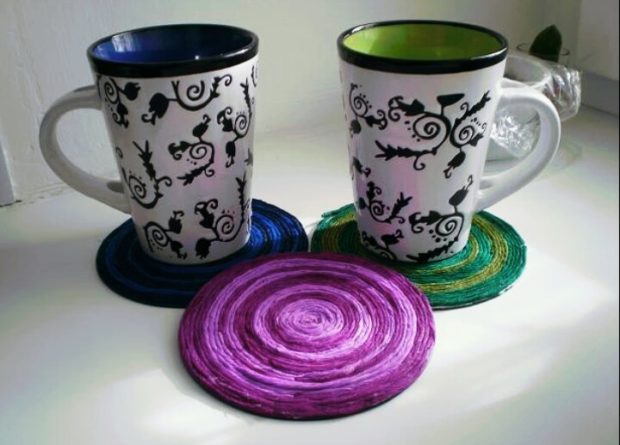
- A more painstaking way - braiding multi-colored discs by threads. To do this, first weaves the base. A thread is drawn through the central hole and a small number of turns are made, about 5-7. Thus, the surface is divided into equal sectors. Now select the desired color and thread the thread in a circle. One step under the main thread, another one above it, and so on in turn. Reminds technology of weaving baskets. Your "web" should be filled completely. You can change the colors of the threads by tying their ends. For a more even pattern, you need to tighten the threads tightly and adjust them so that they form even circles. The ends of the threads at the end of the work are fixed with glue and hidden. Do not want to spin in a circle - just thread the thread through the center until you close the entire surface.
- A way for real needlewomen - we trim old scratched rims beautiful cloth. To do this, you will need not only pieces of interesting material, but also thick cardboard or synthetic winterizer. From any of these materials, you need to cut two circles the size of a disk for each stand.After cutting, smear both sides of the disc with glue and fix the resulting circles. This will help the fabric not slip during subsequent work and make the stand thicker. Now you need to cut two larger pieces from the material selected for the decor with an allowance of about 0.5 cm per seam. Attach a cloth, look carefully so that the edges protrude evenly over the diameter of the disc. Use a few pins to chop the workpiece. Now you need to manually sew the edges. If you can crochet, you can braid a circle around the perimeter with a thin thread and spin a little lace. If not, it’s okay, the seam will help hide the decorative edging. After finishing work, it simply needs to be carefully glued to the end of the stand with hot-melt adhesive. You can make a small loop. Use it to hang the coasters on the wall near the kitchen table.
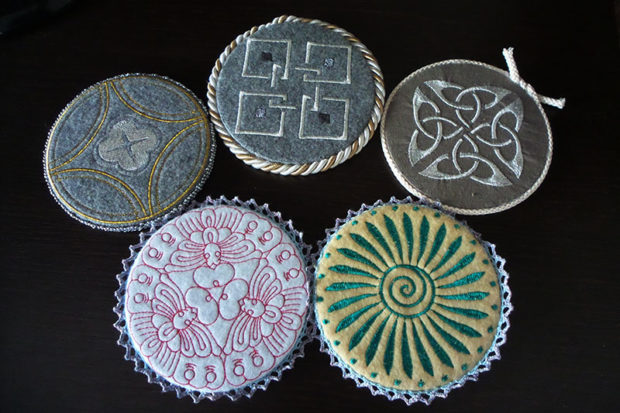
These useful and cute little things can happen if you show a little imagination and perseverance.
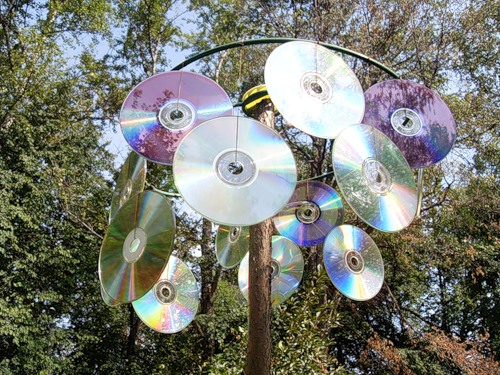
2. Scarecrow for birds
All gardeners and summer residents know how annoying birds can be, which strive to spoil the crop. Previously, to scare them away in the middle of the garden, a large scarecrow was installed in flying clothes and a bucket or pumpkin instead of a head. Agree, such a character can seriously scare young children or neighbors. We suggest you make a more modern scarecrow model that will fascinate you with its beauty and scare away birds with bright highlights. You can determine the shape, height and other parameters based on your own needs. Principle of operation consists in the fact that on a base, for example, on an old holder from a shovel or on an unfit rake, to impose about a dozen disks.
- The foundation must be the letter "T".
- It is advisable to make elements that will sway in the wind, and clink about each other. In the discs, make two holes almost at the outer edge opposite each other. Use drill and a small drill or hot nail.
- Now thread a string or other tight rope into the holes and fasten discs over a short distance. On one strip, 3-5 discs can be mounted depending on the height of the product.
- And the last step is to fix the resulting strips closer to each other and set this miracle to plot.
3. Hanging seed organizer
Where do you store seeds purchased for the planting season? Surely in some kind of box, connected with an elastic band. Not the most convenient option. And after the seeds are sown, where do you put the packaging? Many put it on a stick and put it into the ground at the beginning of the garden, so that in case of a successful shoot and a rich harvest, remember the plant variety and buy the same next year. The option is not bad, but the scorching sun and rains quickly make the bright packaging unrecognizable. So that you can remember exactly what and where it grows, we suggest you make an organizer. To do this, we required:
- A large piece of fabric;
- Lots of small flaps;
- A lot of drives;
- Hot glue;
- Thick paper.
Idea is to create a diagram of your garden with pockets, which will mean the planting zone of a vegetable, and they will contain a package of seeds. In this way, you can remember not only the variety, but also record the date of planting. This basic technology can be supplemented or simplified as you like, the main thing is to understand principle:
- The edges of the large cut need to be bent and hemmed;
- Insert a thin stick into the seam above and below. This will allow you to hang the organizer on the wall;
- To make pockets, paper circles are cut to the size of the disk, then - semicircles of beautiful fabric of larger diameter;
- Their smooth edge is bent and stitched or glued to double-sided tape;
- Now a semicircle is applied to a paper mug, glue is spread on the protruding edges of the fabric and folded onto the back of the paper;
- The resulting paper circles with cloth pockets are glued to the disk, and the disk to the fabric.
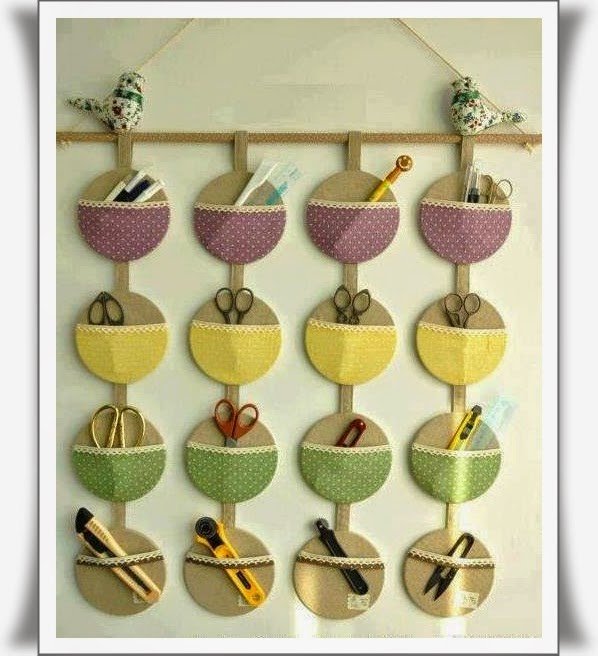
Your organizer is ready.You can simplify the design and connect the pockets to each other with fabric ribbons, and then hang it on a wooden plank.
4. Disco ball
Who said that a summer cottage was created only for grueling planting and harvesting? Sometimes you need to relax and create a cheerful mood. Evening gatherings can turn into a small party, which will become brighter with a disco ball. Make it very simple. There are several options:
- The simplest is to paste over the old rubber ball with fragments of mirror mosaics. To do this, the surface of the ball must be well washed and degreased. Discs with sharp scissors are cut into strips, and into squares. Now stick the pieces onto the ball with the mirror side facing out using superglue. Remember to provide a loop. For greater reliability, take a long flat rope and tie it directly on the ball. By gluing pieces of the disc to the rope, you will secure it forever. In the end, it remains only to tie the ends.
- More difficult way consists in the step-by-step assembly of the construction of solid disks. True, its shape will only remotely resemble a ball. In each disk, it is necessary to make 5 holes at an equal distance almost at the very edge. A small ball will need about 12 discs. Put one disk on the table and place 5 discs right around it. One of the holes on their edge should be opposite the hole on the central disk. Now use the plastic clamps to connect the side discs to the disc in the center. Do not tighten to the very end while the structure is to “move”. Now fasten the side discs together. You will get a flower. Between the disks, stagger another 5 disks and connect. With the last disk, close the structure, tighten the clamps, giving the "ball" shape and cut off the edges.
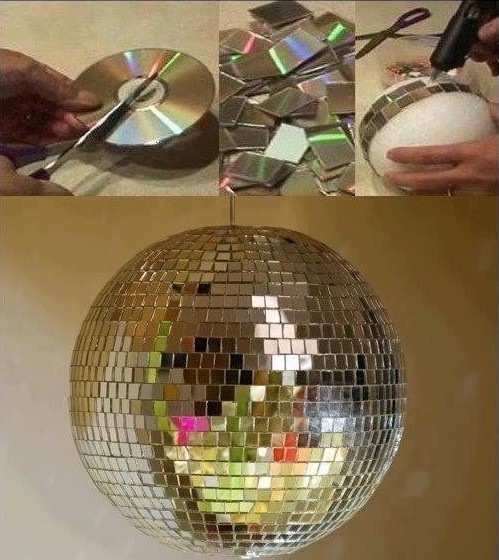
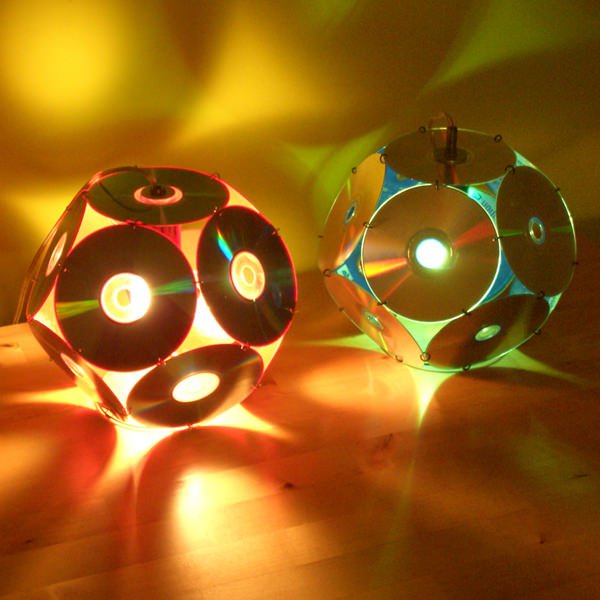
Now it remains only to take care of the source of light and incendiary music.
5. We decorate flowerpots
Many garden areas are decorated with large flower pots and hanging flowerpots. Why not make them more colorful and unusual. For this you required:
- A large number of CDs;
- Sharp scissors;
- Super glue;
- Paint gun;
Essence The method consists in pasting the surface of the pot with pieces of discs. If you approach the issue more creatively, you can pre-paint the surface of the disc with multi-colored markers, let them dry and get a translucent color material for creativity. After giving the discs the desired colors, you need to cut them into fragments. You can observe the proportions and choose the correct geometric shapes, or you can cut into arbitrary pieces. Both options will eventually look beautiful. Just selecting the right “puzzles” for arbitrary cutting will take a little longer. Flowerpot surface must be clean, dry and fat free.
- Spread a small area with glue and begin to place the parts. You can even arrange them with a certain sequence and in the end result get a characteristic pattern.
- When the work is done, let the glue dry.
- You will still have noticeable gaps that must be covered with paint. This is most conveniently done with a pistol.
6. Decorative curtain
This is not a window tulle, but a curtain, which can perform the function of zoning both inside the country house, and on garden plot.  Just imagine how much more comfortable the area where the summer cottage will be benchif you fence off it with an unusual curtain on several sides. To work for us required:
- A lot of CD discs;
- Paper clip packaging;
- Drill;
- Thin drill;
- Wood plank.
First you need to decide on the size future curtains. After that it’s worth considering pattern. This can be done most quickly by placing the discs directly on the floor. You can arrange them one under the other with ordinary stripes, a more beautiful way is to arrange them with an offset, in a checkerboard pattern.Based on the layout method, outline the locations for the mounting holes. This is enough to do on disks from the first and second strip. Knowing their number, you can quickly navigate in further actions.
- Now holes are made with a small drill.
- Fastening the discs together is most likely to be achieved with ordinary paper clips.
- When the whole canvas is ready, you need to insert one clip into the upper edge of the last discs and attach the curtain to the wooden plank.
- Use a marker or pencil to dot the paper clip.
- Now drive in small cloves or stick a push pin directly through a paper clip into a piece of wood. By the way, carnations will be more reliable because if the tree has insufficient density, the seat formed by the tip of the button will cease to hold it in place over time and it will begin to fall out.
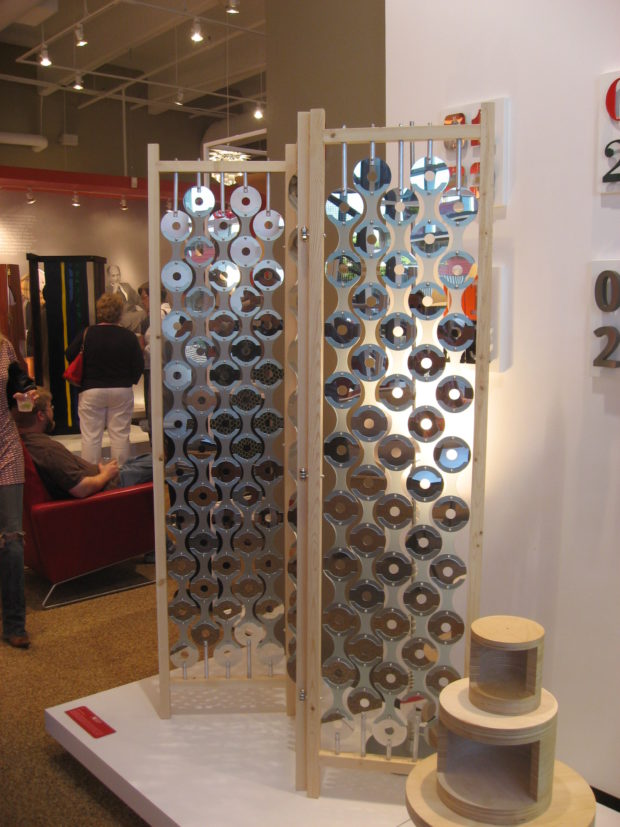
In this simple way, you can erect whole partitions, make them motionless, additionally fixing the lower edge and equip entire recreation areas. And if weave thin into the gaps between the discs new year garlands, you get something unimaginable!
7. Coffee table made of disks
What do countertops not make tables craftsmen! And we offer not only to decorate the table, but also to try to do full-fledged frame from old disks and the remnants of chipboard or other wood materials. To implement the tabletop decor option, we need the same tools as for decorating flowerpots. And the technology will be identical. Fragments of discs or discs are glued onto the prepared surface as a whole, as you like, and then the gaps are filled grouting and varnished.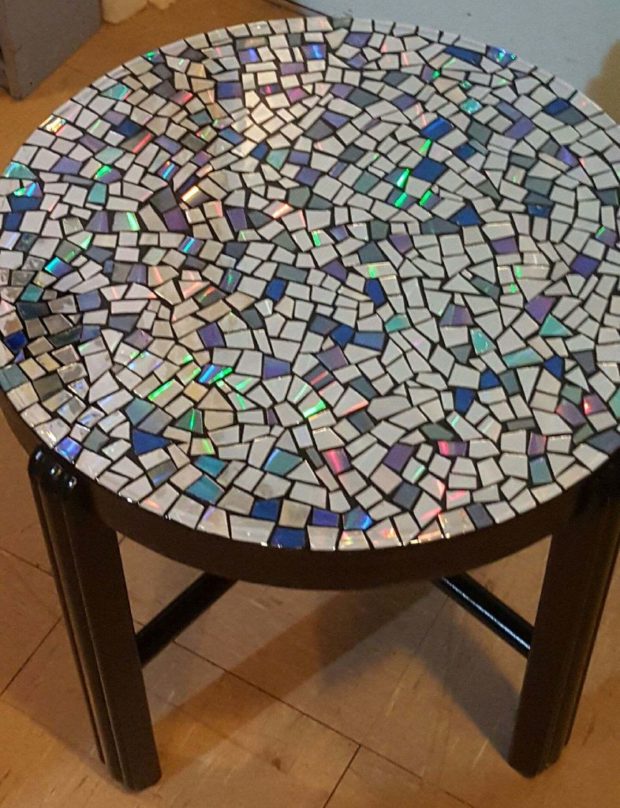 More difficult way consider in more detail. To work for us will need:
- A large number of disks;
- Something that can serve as a countertop - wooden boards, durable plastic, the remnants of chipboard, etc.
- Round wooden rods - 4 pcs.
- Hacksaw.
The last item is necessary for the legs of the future table, so it is better that the pieces of wood are even and high, and their diameter does not exaggerate the diameter of the central hole of the disks. Let's start with the legs. Remember, there was a children's toy in the form of a pyramid of multi-colored plastic bagels of different colors and diameters, which were worn on a stick on a stand? Here is a stand and must be built.
- By the size of the disks, you need to cut 4 circles and nail a wooden pin to them, but it is better to screw self tapping screwhaving previously made a small pot in the center of the circles. This is necessary so that the head of the screw drowned flush with the surface and the table does not stagger.
- On the resulting design, you need to put on so many disks so that they cover the entire length, not reaching the end on the thickness of the tabletop material.
- When the legs are assembled, check their stability, everything should be in order with this.
- Now in the countertop you need to drill four holes along the edges of a slightly smaller diameter than the stem of the legs.
- With some effort, you need to drive the legs into the holes. An interference fit, which will be provided with a smaller diameter of the seat, will perform the function of fasteners without using nails.
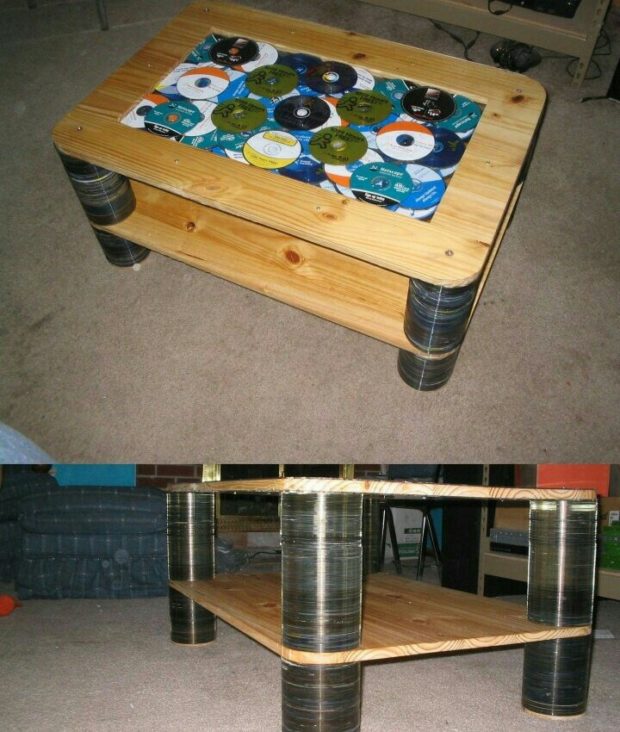
For more functionality, you can to do additional a shelf some distance below the countertop. Then half of the disks are strung on the rod, then a shelf, then the rest half. The diameter of the hole in the shelf should be as close as possible to the diameter of the rod so that it does not "walk" and does not move. This design will also be more rigid and roomy. Decorate countertops can be in a variety of ways. You can lay out the mosaic as we suggested above, or you can cut a part in the middle, fix plywood or transparent plexiglass from the bottom, place a couple of beautiful disks in the niche and close everything with plexiglass from above.
8. Restoring old chairs
It is not surprising that furniture for the cottage usually gets after she has lost her attractive appearance and in the apartment she already has no place, and the hand does not rise to throw out. To breathe new life into old chairs will help our impossibly simple but effective method of restoration. The result will surprise not only you and your guests, but also help to complement the unusual table from the paragraph above. So we will need:
- Old scary chair - unlimited;
- Lots of CDs;
- Sharp scissors;
- Beautiful paper napkins with patterns or glossy magazine;
- PVA glue;
- Grout for joints;
- Sandpaper;
- Lacquer.
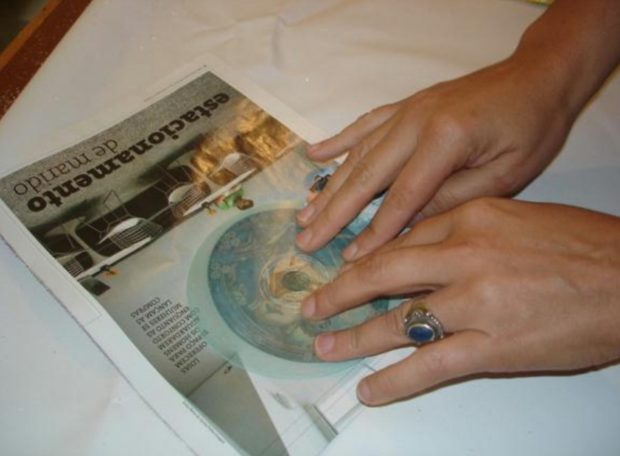
The restoration of one standard-size chair will take about 50 disks. We step back from the mirror surface and try to create something that will look like the old fresco. To do this, we need to get rid of the mirror coating.
- With the help of fine-grained sandpaper, you need to erase the foil and rinse more transparently with plastic under water.
- Choose your favorite picture from the pages of the magazine or other sources, you can use plain color paper. Use what you like and suit room interior.
- Spread a decent layer of PVA glue on the surface of the disc and stick it on the selected page. This must be done with all drives, so a lot of images will also be required.
- When the glue dries, cut off the excess paper;
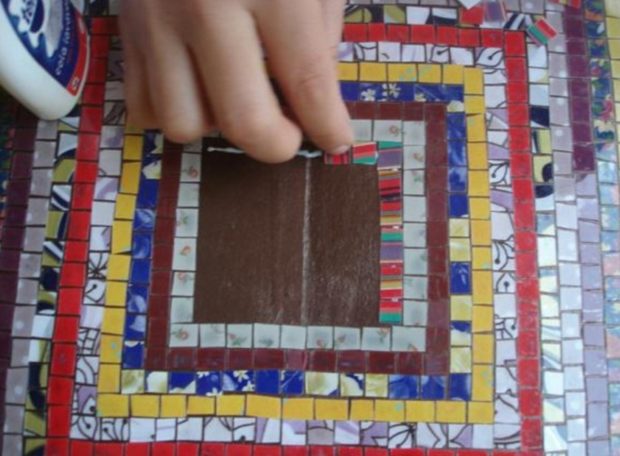
- Cut the disk into small squares 1.5 × 1.5 cm. Why is such a small size needed? Everything is very simple. The seats of old chairs are often deformed and have a dent in the middle. If you make the parts larger, they simply will not be able to snug against the curved surface and precisely repeat its contour. Thus, after some time, the squares will simply fall away, since there will be a void under them.
- For the convenience of further work, you can arrange the squares by color or image style in disposable cups. So it will be much easier to follow the sequence, and lay out the picture.
- Before gluing, wipe the surface of the chair with sandpaper, remove any remaining dust and degrease it.
- Start sticking small squares on PVA or any other glue, moving from the outer contour in a circle.
- To make the chair look more harmonious, paste over the mosaic and the back;
- Leave the chair until the glue has completely dried;
- It's time to fill the voids between the tiles. For this, a normal construction putty is suitable. Choose the color of your choice.
- Put the putty on the mosaic and spread with a rubber spatula, carefully filling the seams;
- Without waiting for it to dry completely, remove excess with a damp rag. It is very important to do this right away, otherwise difficulties may arise later;
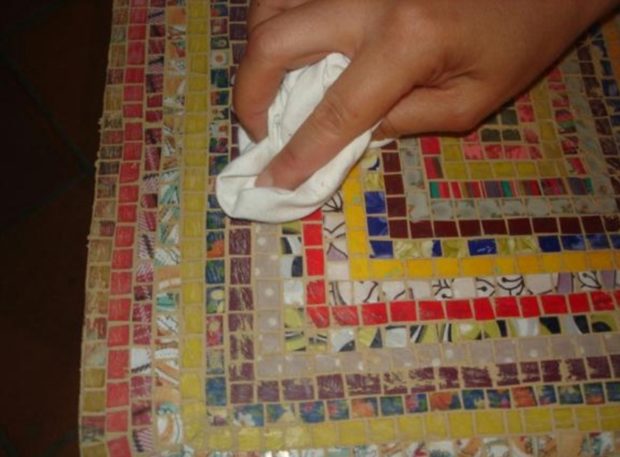
- After the grout has completely dried, cover the back and seat with acrylic varnish. It is better to apply two layers. This will extend the life of the decorative surface.
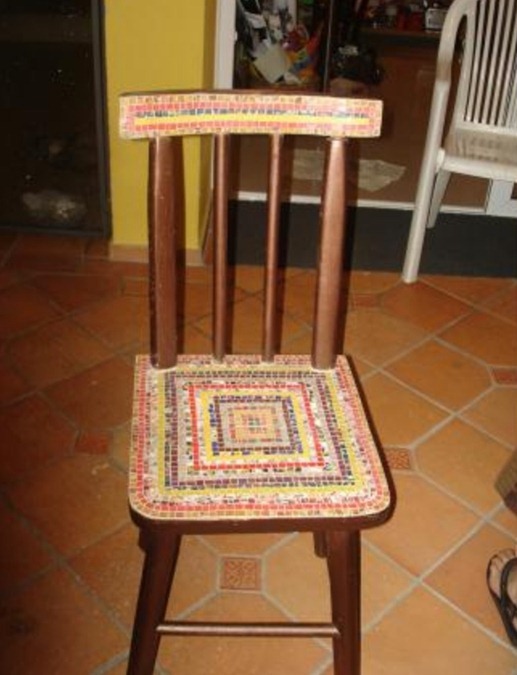
Our new unusual chair is ready. Do not forget that it is not necessary to be limited to these recommendations. In the same way, you can paint the legs of the chair, or just paint them with paint.
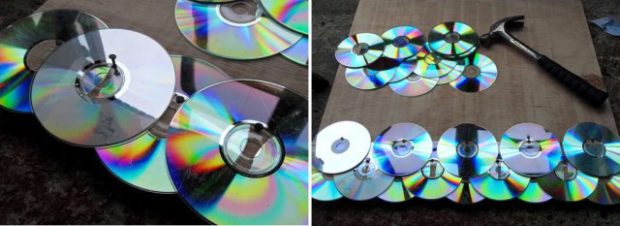
9. Protection from rain and sun - CD roof
And finally, the most practical way old CDs - roofing! Of course, no one means the roof of the house, though ... with due effort, anything is possible. Consider a smaller application area - for example, roof arrangement wellgarden swing small pergolas, canopy for a car or an outbuilding. According to our estimates, about 120 CDs are required to cover 1 square meter of surface. Thanks to the special installation method, which resembles the installation technology roof tiles, each subsequent disk will half overlap the previous one. Thus, the surface that will be located under the disks will be completely protected from hit by rain or melt water. Let's get started to preparatory and installation work:
- In each disk, a hole is required to be drilled, the size of which will ensure the free passage of nail legs or a self-tapping screw into it.This should be done in the place indicated in the picture.
- You can try to drill several disks at once. This will significantly speed up the workflow, most importantly, do not forget to securely fix the entire stack;
- Now you need to decide which side you will stack the discs. If you place the blanks with the shiny side up, they will reflect sunlight, which will extend the life of this coating and help make the room under the roof cooler. But on the other hand, endless sunbeams can annoy not only you, but also neighbors, which will lead to trouble. With the discs shiny side down, you can lay out various patterns from the images on the front, which also looks very attractive;
- Have you decided? Then start to fasten wheels to the roof. Use what you prefer to work with. Course application screwdriver significantly speed up the work.
- Before starting installation, draw horizontal lines that will serve as a guide and will not allow deviation from straightness;
- Get started with bottom edge after all, each subsequent one will go from above to the previous one.
- Be sure to ensure that the central openings of the disks also overlap, otherwise it makes no sense to equip the roof, which has many openings.
- Thus, it is necessary to move up to fully cover the entire surface.

We can confidently say that such a roof can withstand the rays of the scorching sun and heavy rainfall.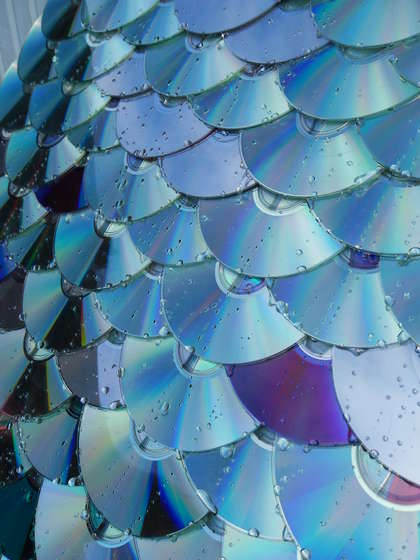

 DIY garden scarecrow: 5 interesting ideas
 9 ideas of crafts made of wood for your garden and your own ...
 40 ideas for crafts from wine corks for home and garden
 Wallpaper for painting: types and techniques of painting
 15 tips on how to make a lampshade / lampshade for a floor lamp ...
 Coloring heating radiators: choice of paint ...
 13 tips to make your own headboard
 plate") 5 tips to stick wallpaper on the OSB (OSB) plate
5 tips to stick wallpaper on the OSB (OSB) plate Non-woven wallpaper: selection, sticking and painting
 How to hammer a nail?
Super everything.
Thanks for the nice review)